Docker Volumes & Storage Deep Dive
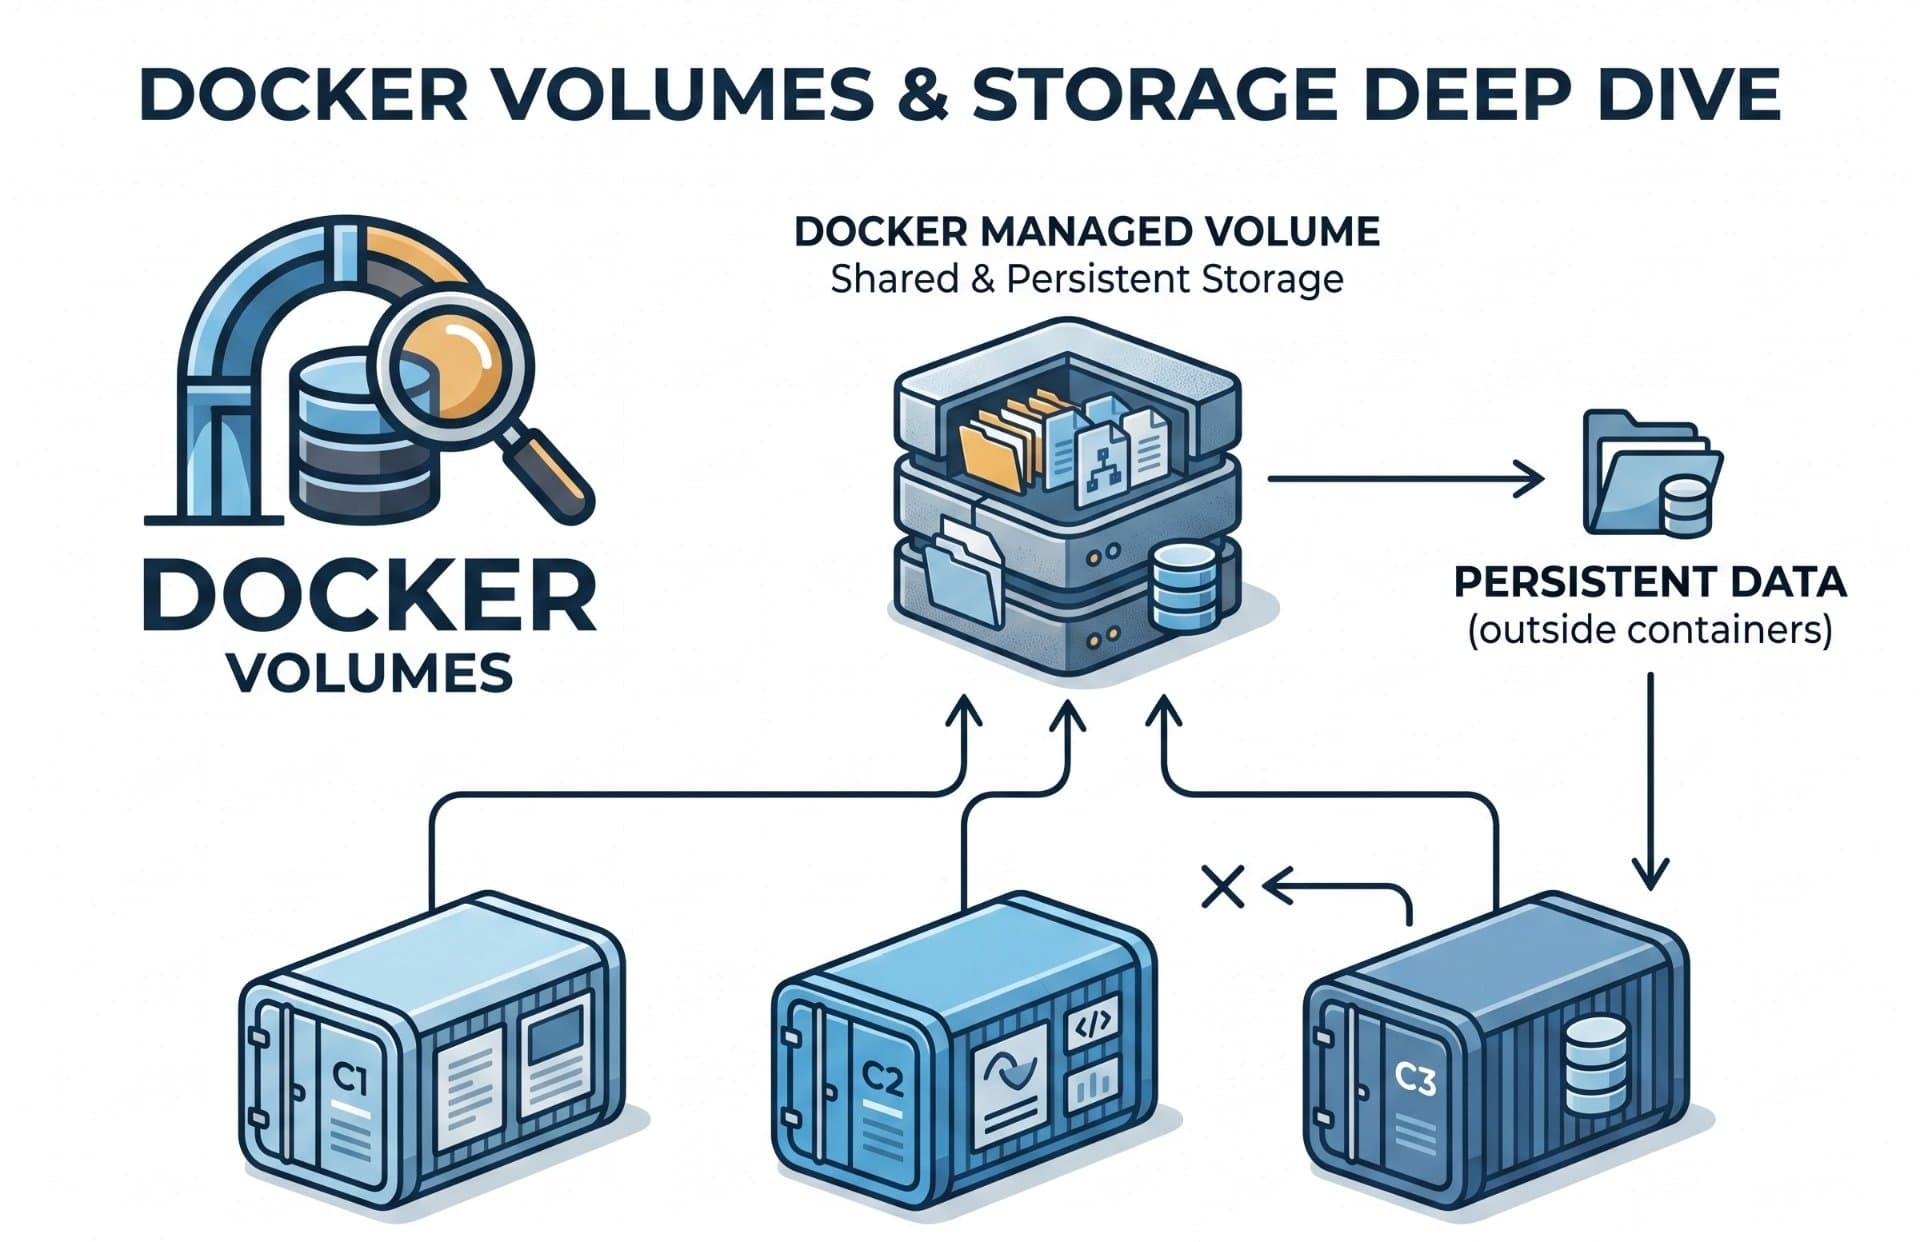
Data is the only thing that matters after a container dies. Understanding how Docker handles storage from the ephemeral writable layer to named volumes, bind mounts, tmpfs, and storage drivers is what separates engineers who lose production data from engineers who never do.

Advertisements
The fundamental problem: containers are ephemeral by design
A container's filesystem is built from image layers read-only stacks that sit beneath a thin writable layer on top. When a container writes a file, it goes into that writable layer. When the container is removed, that writable layer is deleted with it. Everything the container wrote logs, database records, uploaded files, generated reports is gone.
This is not a bug. It is the entire point. Containers are designed to be stateless, replaceable, and ephemeral. You should be able to kill a container and spin up a fresh one with zero ceremony. Statefulness the data that must survive across container restarts, replacements, and upgrades needs to live outside the container lifecycle entirely.
The hotel room analogy
A hotel room is designed for temporary occupation. You can rearrange the furniture, leave your shoes on the floor, hang clothes in the wardrobe but when you check out, housekeeping restores everything to the original state. Your important belongings go in your suitcase your own storage that travels with you, independent of any room. A Docker volume is your suitcase. The container is the hotel room. Data that matters goes in the suitcase, not written on the hotel walls.
The rule: anything a container writes that you want to survive a
docker rmmust be stored in a volume, bind mount, or external storage. Never rely on the container's writable layer for data that matters.
The four storage mechanisms — a side-by-side view
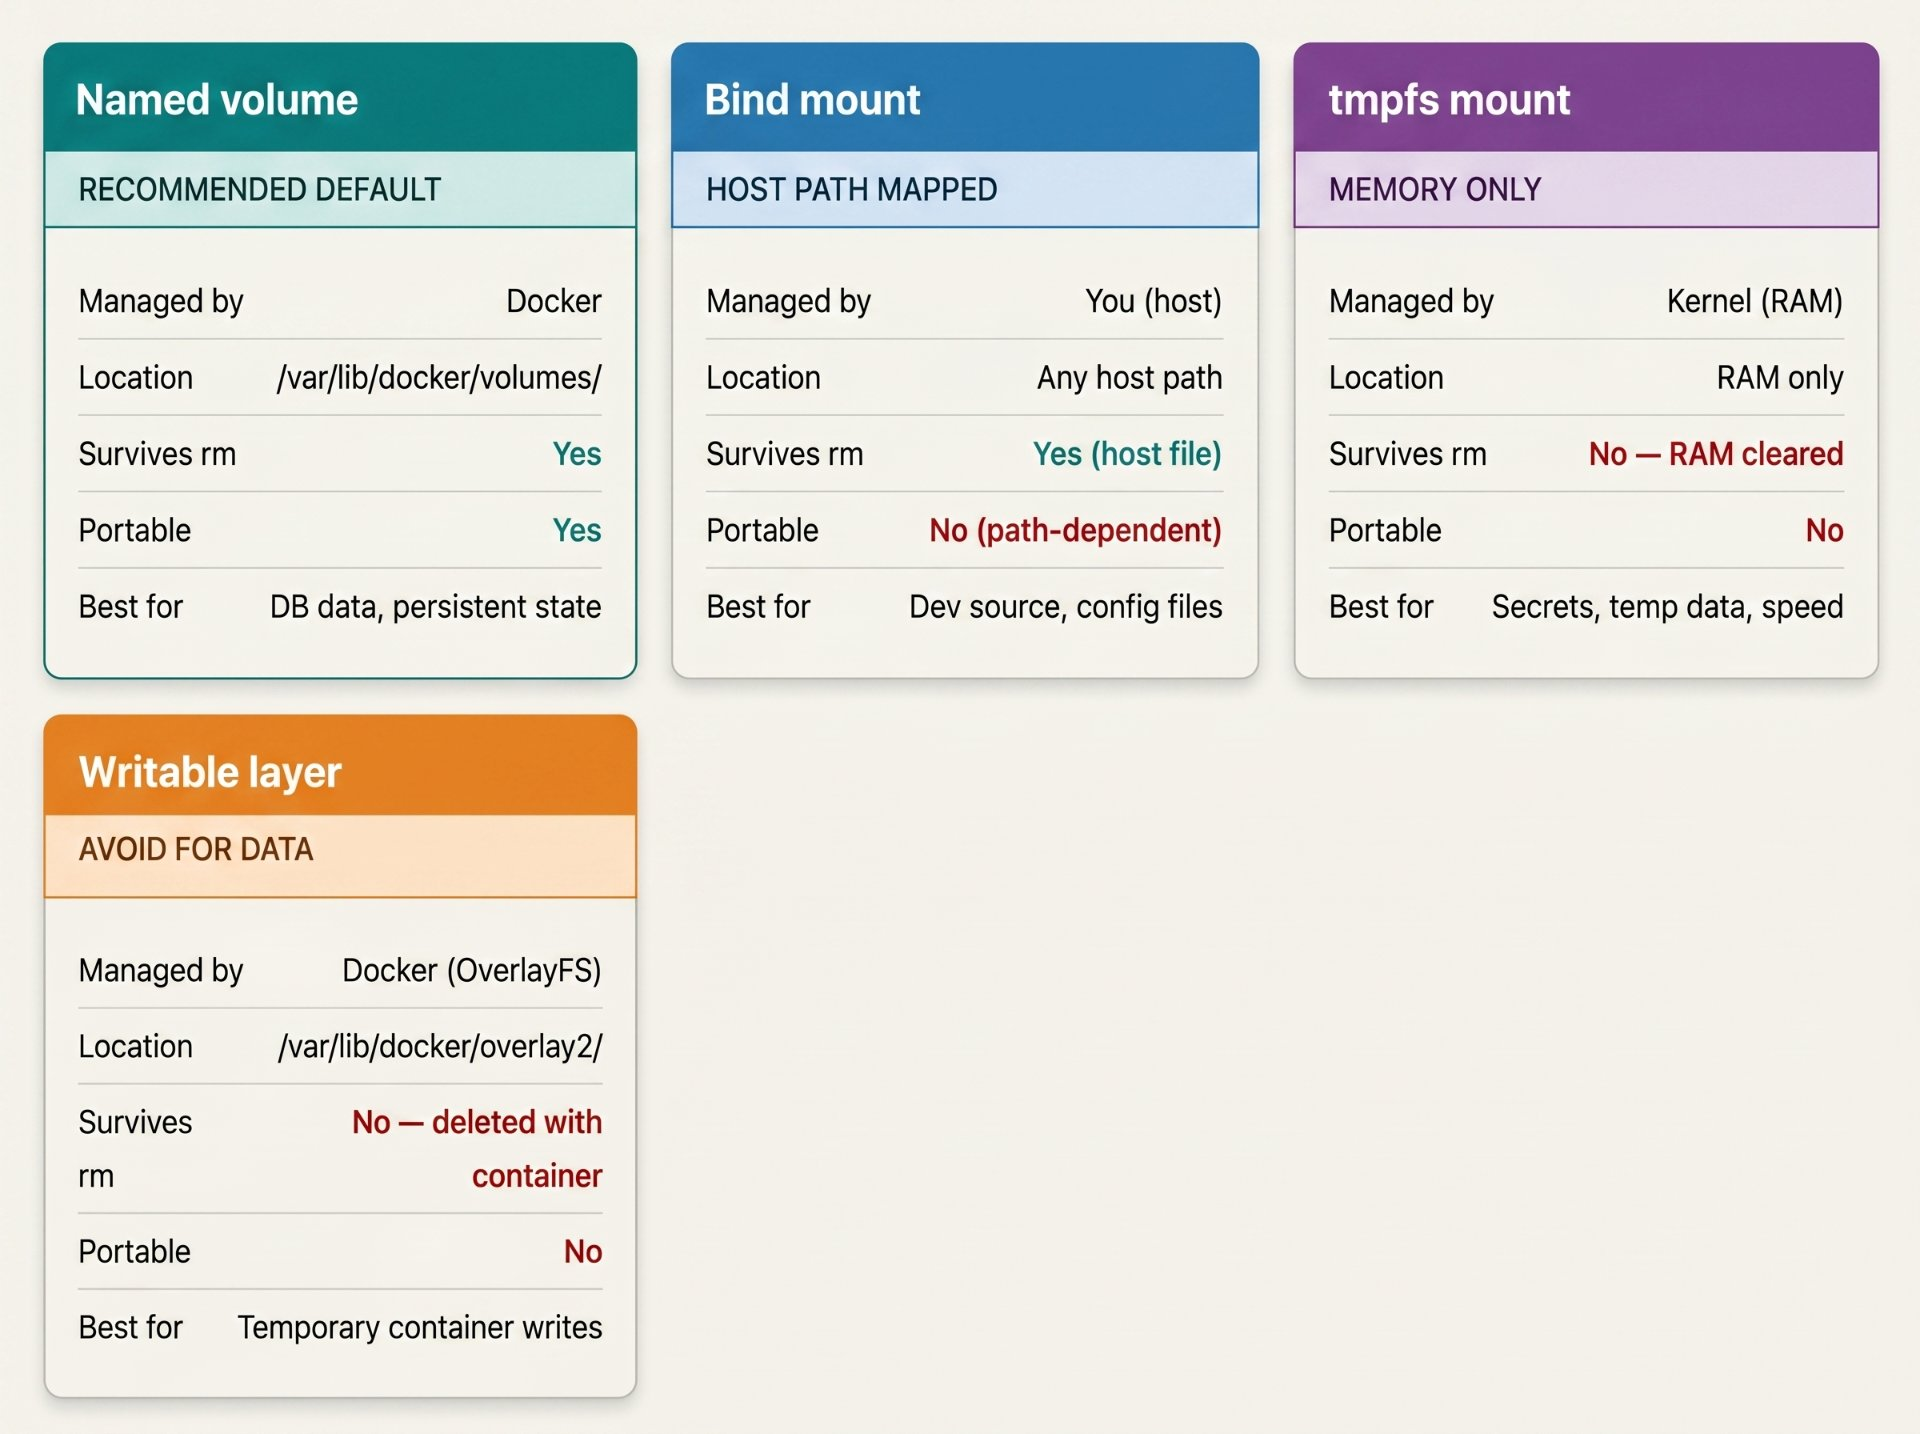
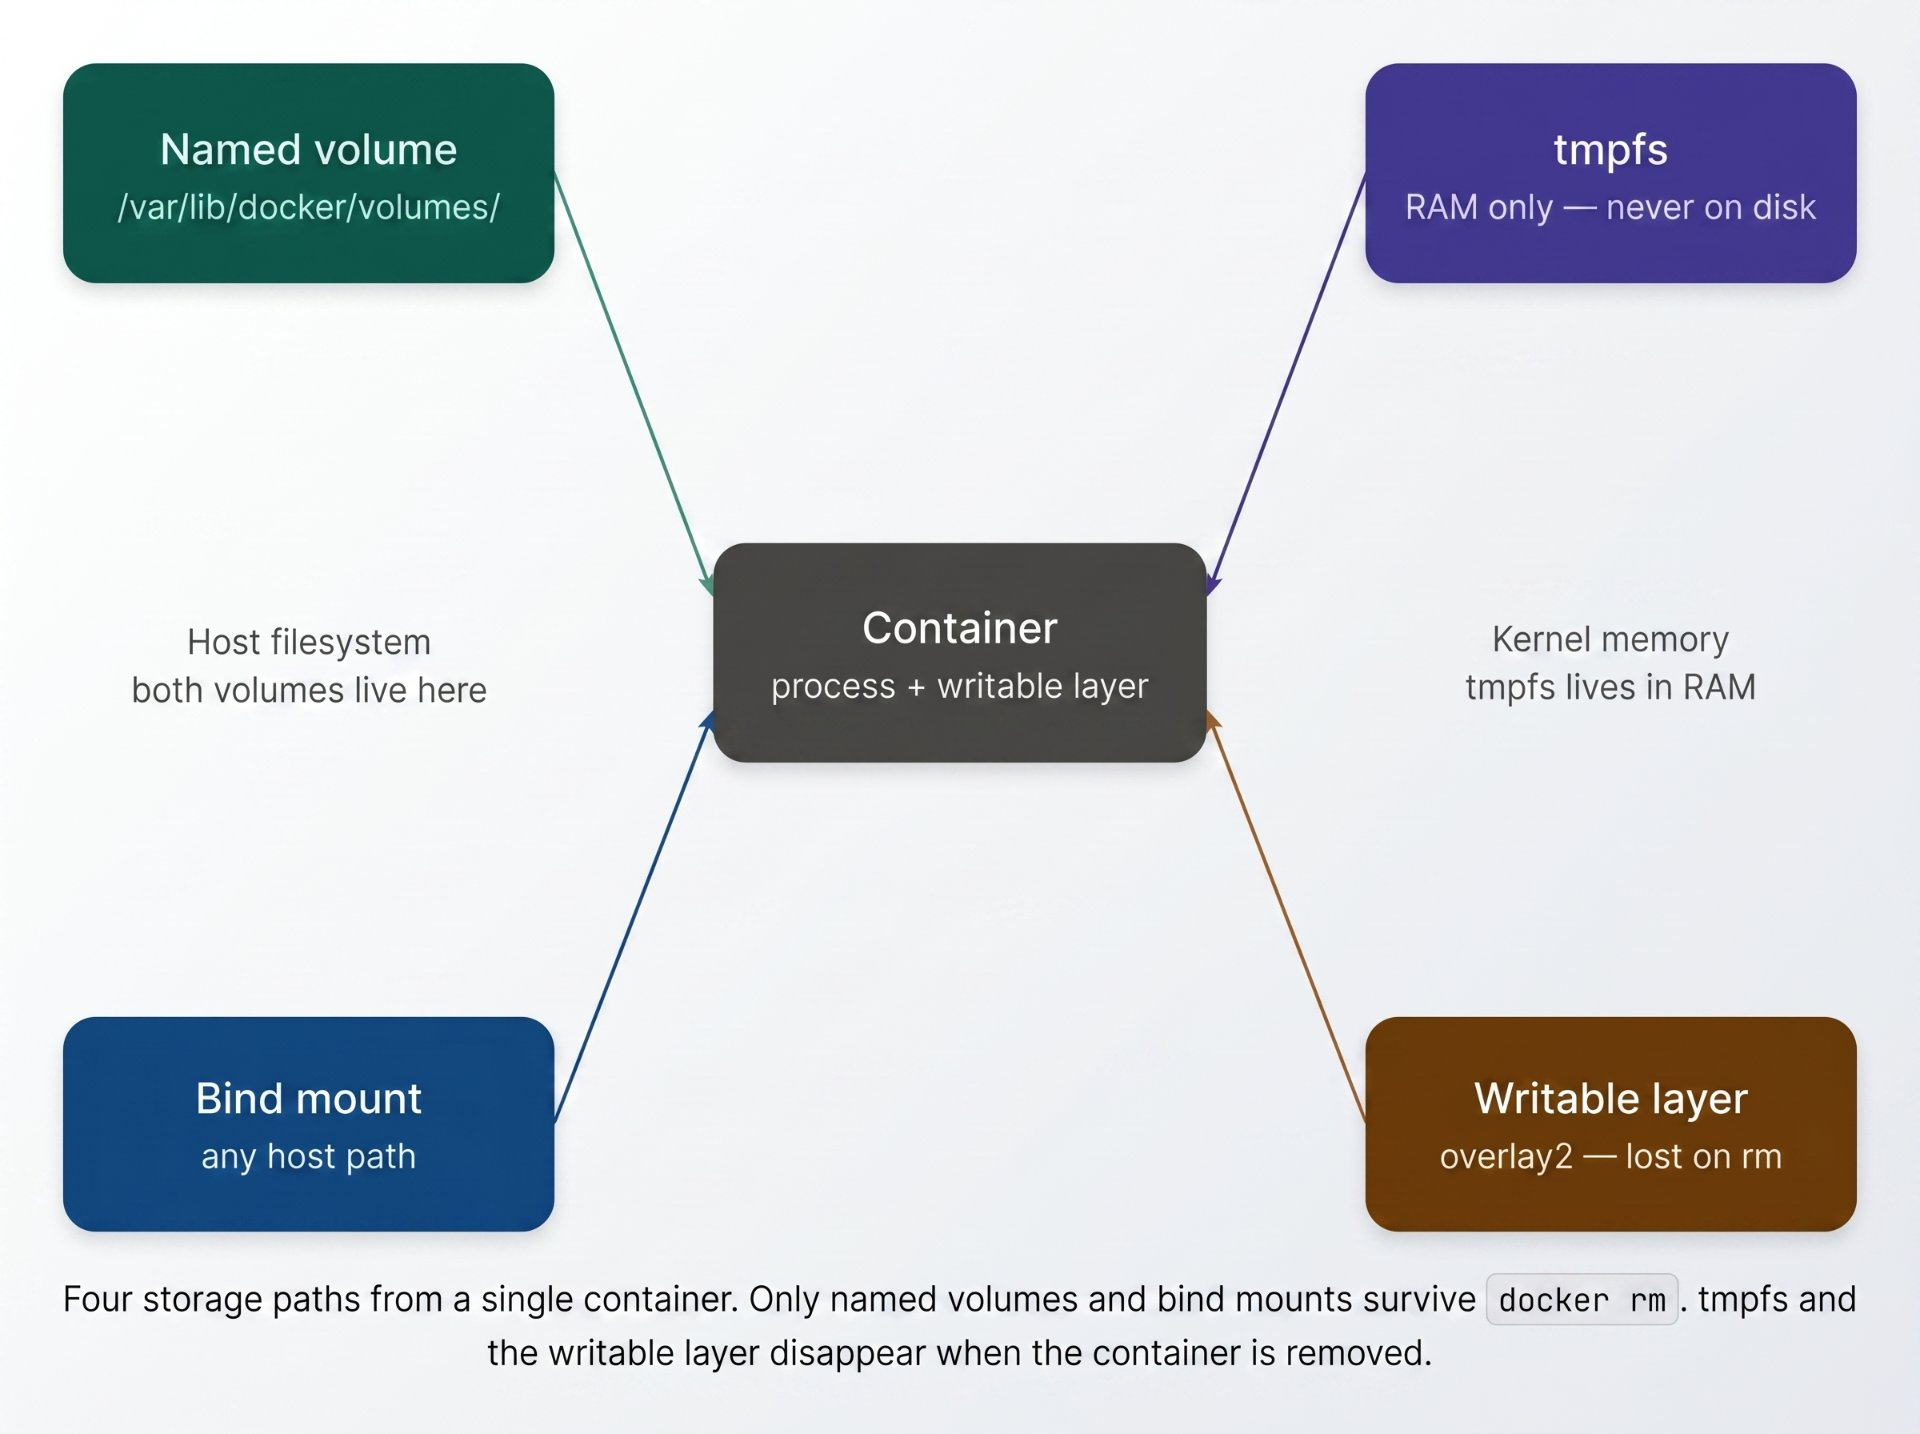
Docker provides four fundamentally different ways to handle storage. Each answers a different question and has a different lifecycle, performance profile, and use case.
Named volumes — the right default for persistent data
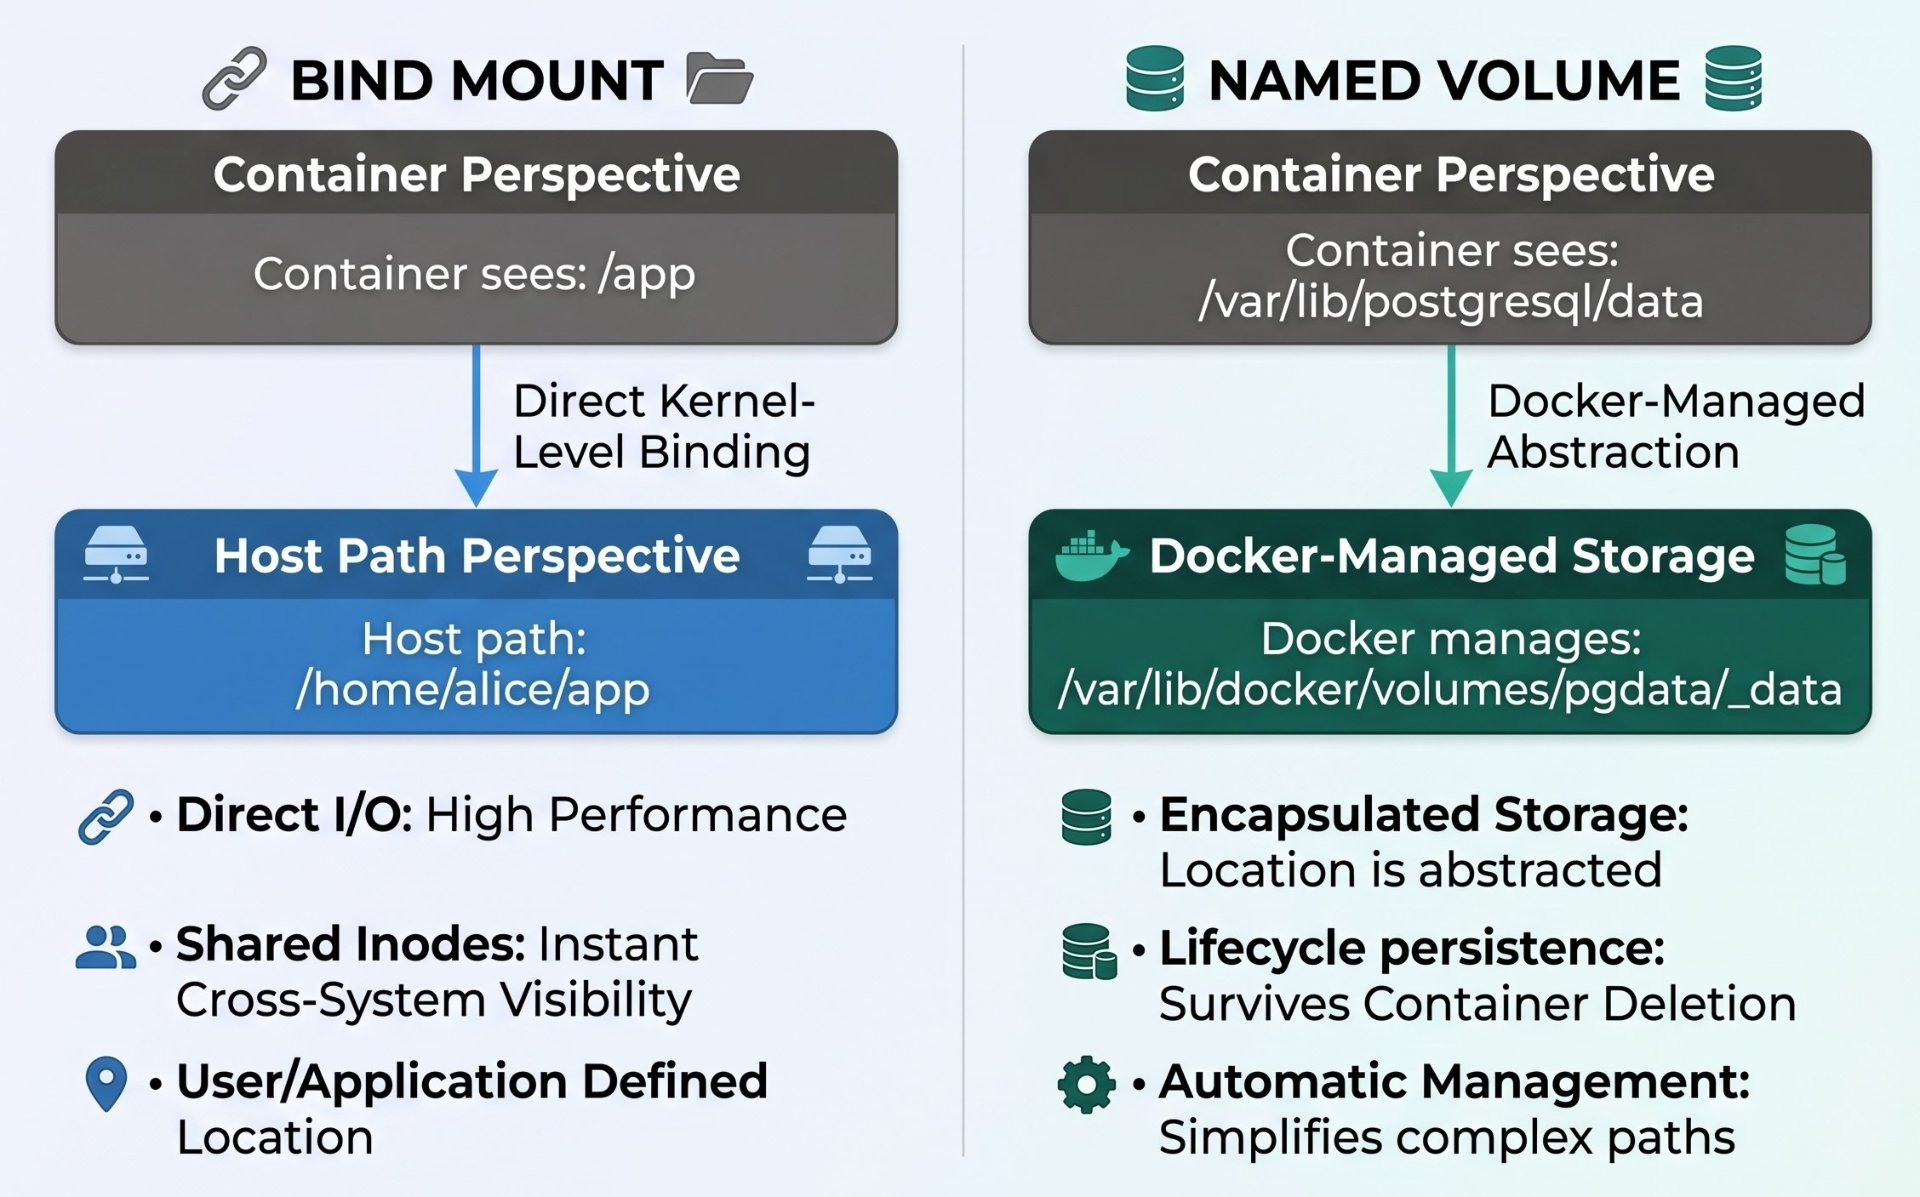
A named volume is a storage unit that Docker creates and manages entirely. You give it a name. Docker stores it under /var/lib/docker/volumes/{name}/_data/ on the host. The container sees it as a regular directory. When the container is removed, the volume persists. It has no dependency on any specific host path it is portable across different Docker environments.
The safety deposit box analogy
A named volume is like a safety deposit box at a bank. The bank (Docker) manages the box assigns it a number, keeps it secure, knows where it is. You don't need to know which vault it is physically stored in. You just ask for box number "pgdata" and the bank gives you access to its contents. Whether you come in on Monday or Friday, whether you go to the front desk or the side entrance, your box and its contents are always there the container (you) can come and go, but the box (volume) stays.
# ── Creating volumes ─────────────────────────────────────────
# Explicit creation (recommended — gives you control)
docker volume create pgdata
docker volume create --driver local \
  --label env=production \
  --label app=myapp \
  pgdata

# Implicit creation (Docker creates it on docker run if it doesn't exist)
docker run -v pgdata:/var/lib/postgresql/data postgres:16

# ── Inspecting volumes ───────────────────────────────────────
docker volume ls
DRIVER    VOLUME NAME
local     pgdata
local     redis-data
local     uploads

docker volume inspect pgdata
[{
  "Name": "pgdata",
  "Driver": "local",
  "Mountpoint": "/var/lib/docker/volumes/pgdata/_data",
  "Labels": {"app": "myapp", "env": "production"},
  "Scope": "local"
}]

# ── Mounting volumes ─────────────────────────────────────────
# Short syntax (-v)
docker run -v pgdata:/var/lib/postgresql/data postgres:16

# Long syntax (--mount) — explicit and unambiguous
docker run \
  --mount type=volume,source=pgdata,target=/var/lib/postgresql/data \
  postgres:16

# Read-only volume mount (container cannot write to it)
docker run \
  --mount type=volume,source=config-data,target=/app/config,readonly \
  myapp:latest

# ── Cleaning up volumes ──────────────────────────────────────
docker volume rm pgdata               # remove a specific volume
docker volume prune                   # remove ALL unused volumes
docker volume prune --filter label=env=staging  # selective prune
Anonymous volumes — the silent danger
If you use -v /var/lib/postgresql/data (no name before the colon), Docker creates an anonymous volume, a volume with a random UUID as its name. These are almost impossible to track, cannot be meaningfully inspected, and are the most common cause of "where did my data go?" panic after a docker rm.
Always name your volumes
Never use anonymous volumes for data you care about. docker run -v /var/lib/postgresql/data postgres creates a volume named a3f8b2c... that is almost impossible to find later. Always provide a name: docker run -v pgdata:/var/lib/postgresql/data postgres. Without a name, docker system prune will silently delete your data the next time it runs.
# Anonymous volumes have random UUID names — hard to identify
docker volume ls
DRIVER    VOLUME NAME
local     pgdata                    ← named — safe
local     a3f8b2c9d1e4f7a0b5c8d2e1  ← anonymous — dangerous
local     uploads                   ← named — safe

# Identify anonymous volumes (no label, UUID name pattern)
docker volume ls --filter dangling=true

# Find which container created an anonymous volume
docker ps -a --format '{{.Names}}: {{.Mounts}}'Bind mounts — direct access to the host filesystem
A bind mount maps a specific path on the host into the container. Unlike a named volume, you control the exact location. The container sees the directory as its own, but any changes made inside the container are immediately visible on the host and vice versa. There is no copy. There is no intermediary. The kernel maps the same inode directly into both namespaces.
The shared whiteboard analogy
A bind mount is like two people in different offices sharing one physical whiteboard via a video feed that is so real-time it is instantaneous actually it is literally the same whiteboard in a shared physical room. Whatever one person writes, the other sees immediately. It is not a copy. It is not a sync. It is the same data, seen through two different doors. A bind mount is that shared whiteboard the host and the container see exactly the same bytes at the same filesystem path, with no latency and no intermediary.
# Short syntax — host:container
docker run -v /home/alice/app:/app myimage

# Long syntax (--mount) — preferred for clarity
docker run \
  --mount type=bind,source=/home/alice/app,target=/app \
  myimage

# Read-only bind mount — container reads, cannot write
docker run \
  --mount type=bind,source=/etc/nginx/nginx.conf,target=/etc/nginx/nginx.conf,readonly \
  nginx:alpine

# Current directory (common in development)
docker run -v $(pwd):/app myimage
docker run -v ${PWD}:/app myimage   # same thing

# Bind mount a single file (not just directories)
docker run \
  --mount type=bind,source=$(pwd)/config.json,target=/app/config.json \
  myimage

# The selinux label option on RHEL/Fedora systems
# :z = shared label (multiple containers can use it)
# :Z = private label (only this container)
docker run -v /data/myapp:/app:z myimage   # SELinux relabelling
The node_modules problem — the most common bind mount trap
In development, you bind-mount your source code into the container so edits are reflected immediately. But this creates a conflict: if you ran npm install locally, your node_modules on the host might have binaries compiled for your OS, not for the Linux container. The bind mount overwrites the container's node_modules with yours and things break in confusing ways.
# In docker-compose.yaml
services:
  api:
    build: .
    volumes:
      # Bind mount the source code for hot reload
      - .:/app
      # Anonymous volume at /app/node_modules
      # This SHADOWS the bind-mount's node_modules
      # so the container keeps its own compiled dependencies
      - /app/node_modules

# How it works:
# 1. .:/app bind-mounts your source (including local node_modules)
# 2. /app/node_modules anonymous volume SHADOWS that subdirectory
# 3. Container uses its own node_modules (installed during docker build)
# 4. Your source edits are live — your local node_modules are hidden
Bind mounts and permissions
When a container process runs as a non-root user (UID 1000, say) and tries to write to a bind-mounted directory owned by root on the host, it gets Permission denied. Fix: either chown the host directory to the container's UID, or use --user $(id -u):$(id -g) to run the container as your host user. This is one of the most frequent pain points in containerised development environments.
tmpfs — storage that lives and dies in RAM
A tmpfs mount allocates storage in the machine's RAM (and optionally swap). It is the fastest possible storage reads and writes happen at memory speed, orders of magnitude faster than any disk. The trade-off is absolute: when the container stops, the data is gone. When the machine reboots, it is gone. It never touches a disk.
The whiteboard in a meeting room analogy
A tmpfs is like a whiteboard in a meeting room. It is the fastest way to get ideas out you can write and erase instantly, with no friction. But when the meeting ends and everyone leaves, the whiteboard gets erased. You cannot take the whiteboard home. You cannot email it. It exists only for the duration of the session. tmpfs works identically: blazing fast, perfectly ephemeral, and absolutely gone when the container stops.
# Basic tmpfs mount
docker run --tmpfs /tmp myimage

# tmpfs with size limit and permissions
docker run \
  --mount type=tmpfs,target=/tmp,tmpfs-size=64m,tmpfs-mode=1777 \
  myimage

# Read-only root filesystem + tmpfs for writable directories
# This is the security-hardened pattern
docker run \
  --read-only \
  --tmpfs /tmp:size=50m,mode=1777 \
  --tmpfs /var/run:size=10m \
  --tmpfs /var/log:size=20m \
  myimage

# In compose.yaml
# services:
#   api:
#     volumes:
#       - type: tmpfs
#         target: /tmp
#         tmpfs:
#           size: 67108864   # 64 MB
When to use tmpfs
Use tmpfs for: session tokens and in-memory caches that must never touch disk, temporary computation scratch space, test fixtures that need fast I/O, /tmp and /var/run when using --read-only containers, and any sensitive data (encryption keys, passwords) that should evaporate when the container exits. Never use it for anything you want to survive a restart.
The container writable layer — what it is and why it is slow
Every container automatically has a thin writable layer on top of its read-only image layers. This is where all filesystem writes go by default any file the container creates, modifies, or deletes lands here. It is managed by the storage driver (OverlayFS by default) and is completely ephemeral.
The writable layer uses a mechanism called Copy-on-Write (CoW): when a container modifies a file from a read-only image layer, OverlayFS first copies the entire file into the writable layer, then applies the modification there. The original in the read-only layer is untouched. This copy operation is the performance penalty.
The photocopy analogy
Imagine you have a published book (the image layers read-only). You want to annotate a page. You cannot write in the original it is shared. So you photocopy the page, write your annotation on the photocopy, and keep the photocopy in your folder (the writable layer). The original book is unmodified. This is Copy-on-Write: a full copy is made before any modification. The cost is the photocopying fine for a page, expensive for a thousand-page chapter.
Never write important data here
The writable layer is deleted when docker rm is run. It is also slow every write to a large file incurs a full copy-up from the lower image layers. Databases writing to the writable layer are a double disaster: data loss risk and significant performance degradation. Always use a volume or bind mount for database files, application data, and anything that must persist.
# Find the container's writable layer on the host
docker inspect mycontainer --format '{{.GraphDriver.Data.MergedDir}}'
/var/lib/docker/overlay2/abc123def456/merged

# See ONLY what the container wrote (the upperdir = writable layer)
docker inspect mycontainer --format '{{.GraphDriver.Data.UpperDir}}'
/var/lib/docker/overlay2/abc123def456/diff

sudo ls /var/lib/docker/overlay2/abc123def456/diff/
tmp/   var/log/   etc/hosts   etc/resolv.conf
# Only files the container actually wrote — not the full filesystem

# See changes made to a container's filesystem
docker diff mycontainer
C /etc                  ← Changed
C /etc/hosts
A /tmp/tempfile         ← Added
D /var/log/old.log ← DeletedStorage drivers — the engine beneath the layers
A storage driver is the kernel-level component responsible for managing the image layer stack and the container's writable layer. It implements the union filesystem that presents multiple read-only layers plus the writable layer as a single, coherent filesystem to the container process.
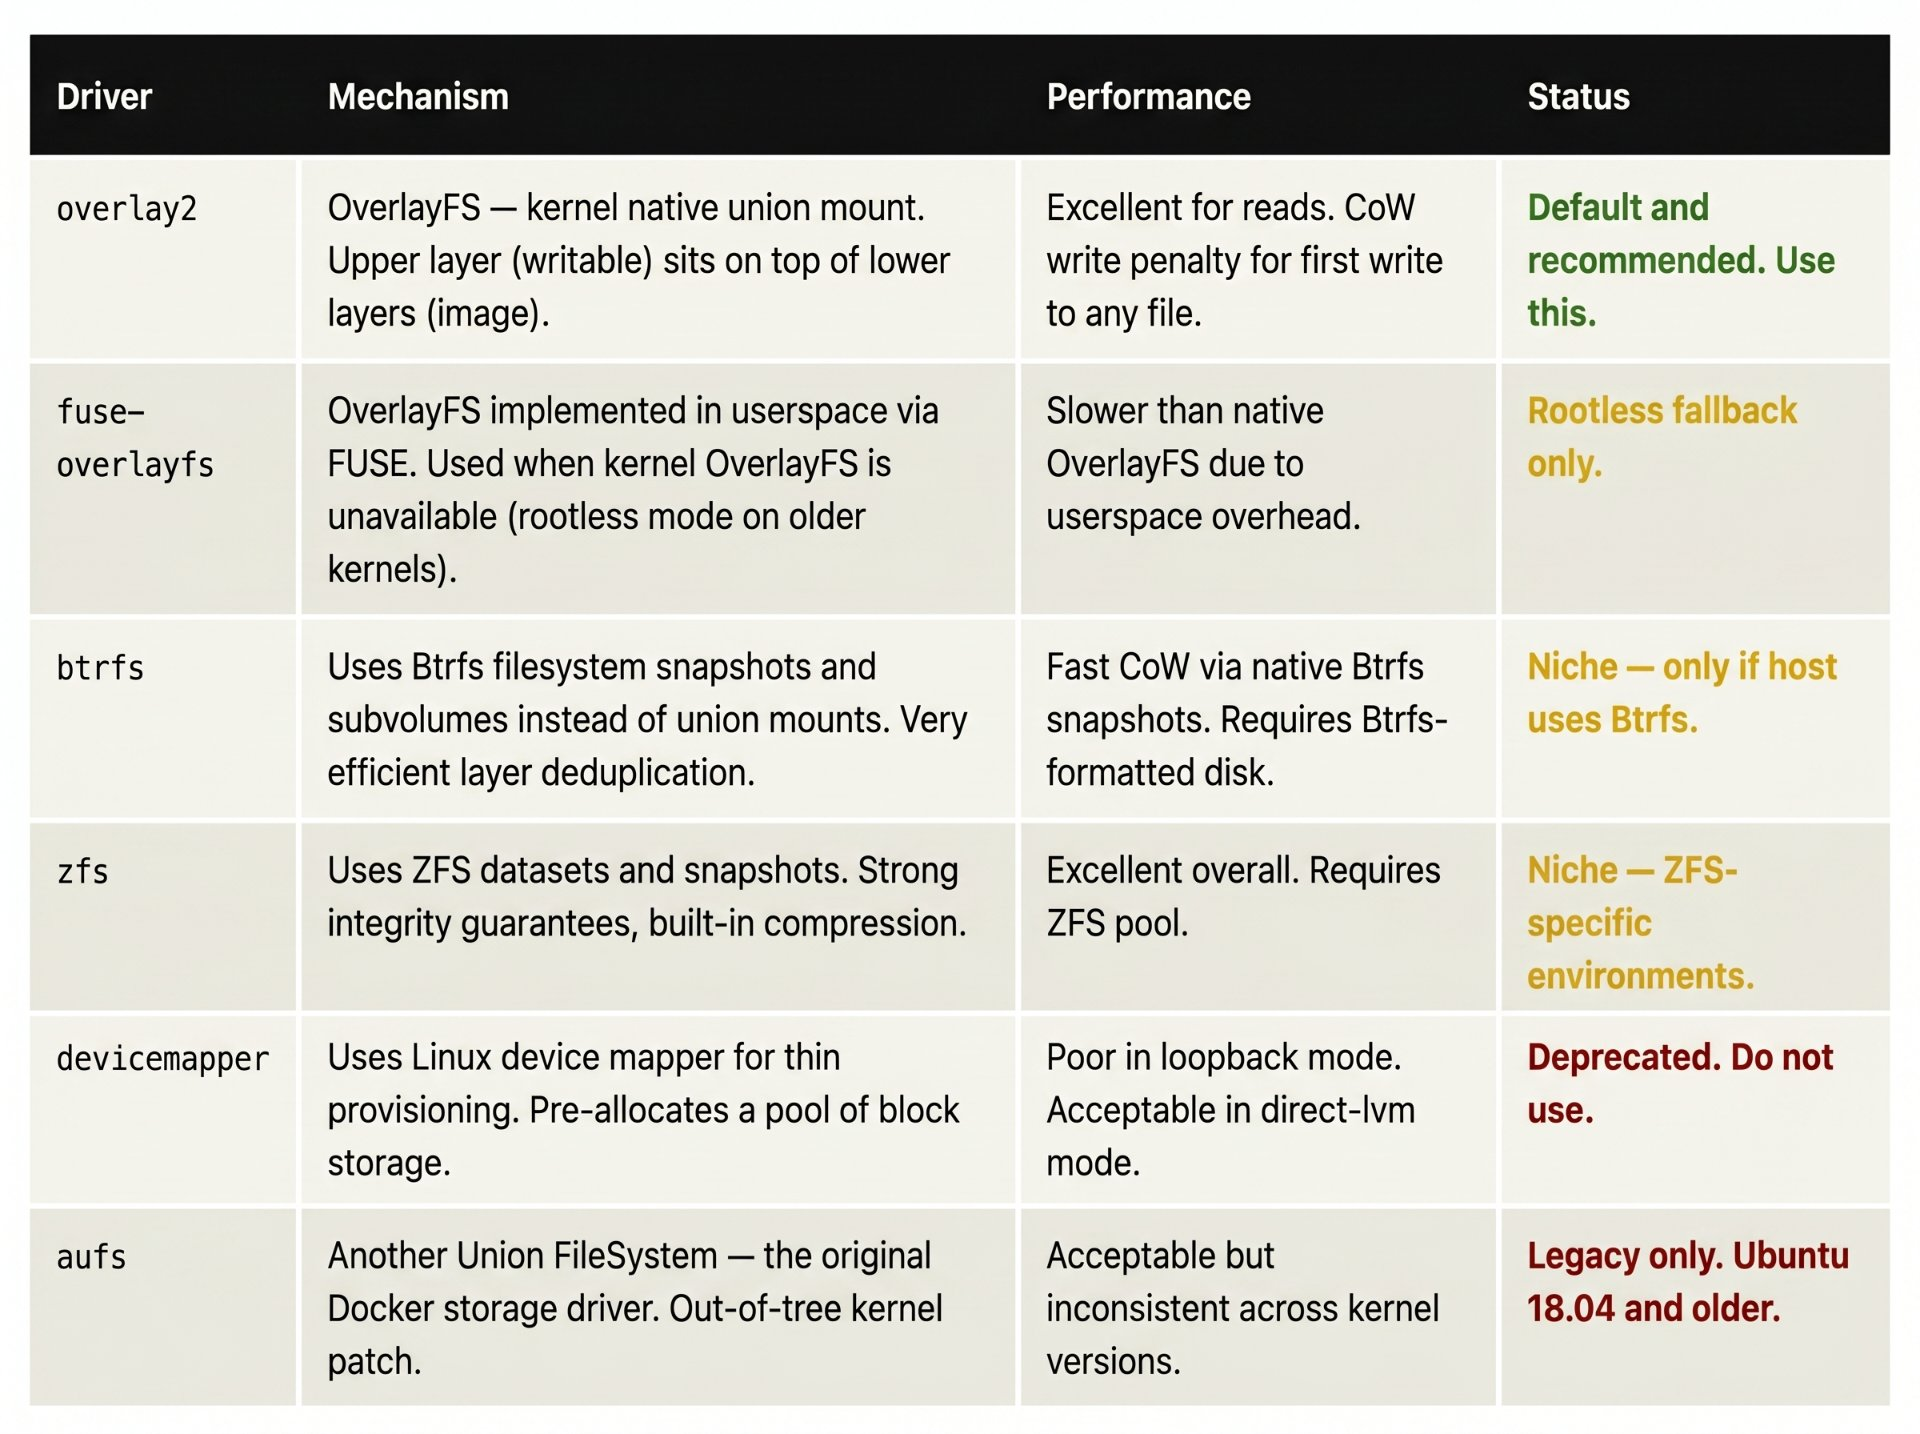
overlay2 — why it is the right answer for almost everyone
OverlayFS has been in the mainline Linux kernel since 3.18 (2014) and is the native union filesystem for Linux. Unlike its predecessors, it requires no kernel patches, no pre-allocated storage pools, and no special filesystem on the host disk. It works on any ext4 or xfs filesystem. The storage driver choice only affects the container's writable layer and the image layer stack it does not affect volume or bind mount performance at all.
# Check your current storage driver
docker info --format '{{.Driver}}'
overlay2

# More detail
docker info | grep -A 5 "Storage Driver"
Storage Driver: overlay2
  Backing Filesystem: extfs
  Supports d_type: true
  Using metacopy: false
  Native Overlay Diff: true

# Configure in /etc/docker/daemon.json
# {
#   "storage-driver": "overlay2",
#   "storage-opts": [
#     "overlay2.size=20G"  ← optional per-container size limit
#   ]
# }Volume drivers — storage beyond the local disk
By default, named volumes are stored on the local disk of the host running Docker. For production systems especially in cloud environments or Kubernetes you often need volumes that live on shared storage, so containers running on different hosts can access the same data. Volume drivers make this possible.
# ── Local driver with NFS backend ────────────────────────────
docker volume create \
  --driver local \
  --opt type=nfs \
  --opt o=addr=10.0.0.10,rw,nfsvers=4 \
  --opt device=:/exports/myapp-data \
  nfs-volume

docker run --mount source=nfs-volume,target=/data myapp

# ── AWS EFS (via NFS) ─────────────────────────────────────────
docker volume create \
  --driver local \
  --opt type=nfs4 \
  --opt o=addr=fs-abc123.efs.us-east-1.amazonaws.com,rw \
  --opt device=:/ \
  efs-volume

# ── Portworx (cluster-aware volume driver) ────────────────────
# Install Portworx on each node, then:
docker volume create \
  --driver pxd \
  --opt size=10 \
  --opt repl=3 \
  --opt io_priority=high \
  px-postgres-volume

# ── Azure Files (SMB/CIFS) ────────────────────────────────────
docker volume create \
  --driver local \
  --opt type=cifs \
  --opt device=//myaccount.file.core.windows.net/myshare \
  --opt o=vers=3.0,username=myaccount,password=mykey,dir_mode=0777 \
  azure-volume

# ── List all volume drivers available ─────────────────────────
docker info --format '{{range .Plugins.Volume}}{{.}}{{"\n"}}{{end}}'
local
pxdVolumes in Docker Compose — production-grade patterns
name: myapp

services:
  api:
    image: myapp/api:latest
    volumes:
      # Named volume — database writes go here
      - type: volume
        source: uploads
        target: /app/uploads

      # Bind mount — config file from host (read-only)
      - type: bind
        source: ./config/app.yaml
        target: /app/config/app.yaml
        read_only: true

      # tmpfs — in-memory temp space
      - type: tmpfs
        target: /tmp
        tmpfs:
          size: 67108864

  db:
    image: postgres:16-alpine
    volumes:
      # Postgres data must outlive the container
      - type: volume
        source: pgdata
        target: /var/lib/postgresql/data
    environment:
      POSTGRES_DB: myapp
      POSTGRES_USER: myapp
      POSTGRES_PASSWORD_FILE: /run/secrets/db_password

  redis:
    image: redis:7-alpine
    command: redis-server --appendonly yes
    volumes:
      - type: volume
        source: redis-data
        target: /data

# Top-level volumes block — declares all named volumes
volumes:
  pgdata:
    driver: local
    labels:
      app: myapp
      backup: required       # used by backup scripts to find volumes

  uploads:
    driver: local
    labels:
      app: myapp
      backup: required

  redis-data:
    driver: local

  # External volume — pre-created outside Compose
  # Docker won't create or destroy it — you manage it
  shared-config:
    external: true
name: company-shared-configBackup, restore, and migration — keeping your data safe
Volumes that are never backed up are not persistent storage they are slow-motion data loss. Here are the patterns that actually work in production.
# ── Pattern 1: Tar backup to host ────────────────────────────
# Run a temporary container that mounts the volume and streams
# a tar archive to the host filesystem
docker run --rm \
  --mount source=pgdata,target=/data,readonly \
  busybox \
  tar czf - /data > /backups/pgdata-$(date +%Y%m%d-%H%M%S).tar.gz

# ── Pattern 2: Restore from tar ──────────────────────────────
docker run --rm \
  --mount source=pgdata,target=/data \
  busybox \
  tar xzf - /data < /backups/pgdata-20240115-143022.tar.gz

# ── Pattern 3: Volume-to-volume copy ─────────────────────────
# Create new volume, copy all content from old to new
docker volume create pgdata-backup
docker run --rm \
  --mount source=pgdata,target=/from,readonly \
  --mount source=pgdata-backup,target=/to \
  busybox \
  cp -av /from/. /to/

# ── Pattern 4: Postgres-specific backup ──────────────────────
# Use pg_dump — produces portable SQL, not raw files
docker exec postgres-container \
  pg_dump -U myapp mydb > /backups/mydb-$(date +%Y%m%d).sql

# Restore from SQL dump
docker exec -i postgres-container \
  psql -U myapp mydb < /backups/mydb-20240115.sql

# ── Pattern 5: Migration between hosts ───────────────────────
# Export a volume to a tar archive
docker run --rm \
  --mount source=pgdata,target=/data,readonly \
  busybox tar czf - /data | ssh user@newhost "cat > /tmp/pgdata.tar.gz"

# On the new host: create volume and import
docker volume create pgdata
docker run --rm \
  --mount source=pgdata,target=/data \
  busybox tar xzf - < /tmp/pgdata.tar.gz
Automate backups with a sidecar container
In production, run a backup sidecar container that mounts your data volumes and periodically pushes backups to S3, GCS, or another durable store. Tools like restic, duplicati, and velero (for Kubernetes) are designed for exactly this pattern. A volume that is not automatically backed up on a schedule will eventually be lost plan for it from day one.
Performance deep dive — why storage choice changes everything
The difference in I/O performance between storage mechanisms is not marginal. It is orders of magnitude. Choosing the wrong storage type for a database is one of the fastest ways to tank application performance in production.
# Benchmark 1: Named volume (passes through to host disk directly)
docker run --rm \
  --mount source=bench-vol,target=/data \
  ubuntu bash -c \
  "dd if=/dev/zero of=/data/test bs=1M count=512 oflag=direct 2>&1"
512+0 records out — 512 MB/s   ← native disk speed

# Benchmark 2: Container writable layer (goes through OverlayFS CoW)
docker run --rm \
  ubuntu bash -c \
  "dd if=/dev/zero of=/test bs=1M count=512 oflag=direct 2>&1"
512+0 records out — 180 MB/s   ← CoW overhead reduces throughput

# Benchmark 3: tmpfs (pure RAM speed)
docker run --rm \
  --tmpfs /tmp:size=600m \
  ubuntu bash -c \
  "dd if=/dev/zero of=/tmp/test bs=1M count=512 2>&1"
512+0 records out — 8,200 MB/s  ← RAM speed — 45x faster than CoW

# Real-world impact on PostgreSQL:
# pgdata in writable layer: ~2,000 TPS (transactions/sec)
# pgdata in named volume:   ~8,500 TPS
# Difference: 4x — same hardware, just different storage mechanism
The performance rule
Named volumes and bind mounts bypass OverlayFS entirely writes go directly to the host filesystem at full disk speed. The container writable layer goes through OverlayFS's copy-on-write mechanism, which adds overhead proportional to the size of the files being modified. For databases, message queues, and any write-heavy workload: always use a named volume. For read-heavy workloads writing small amounts: the writable layer overhead is usually acceptable.
The decision guide — choosing the right storage type
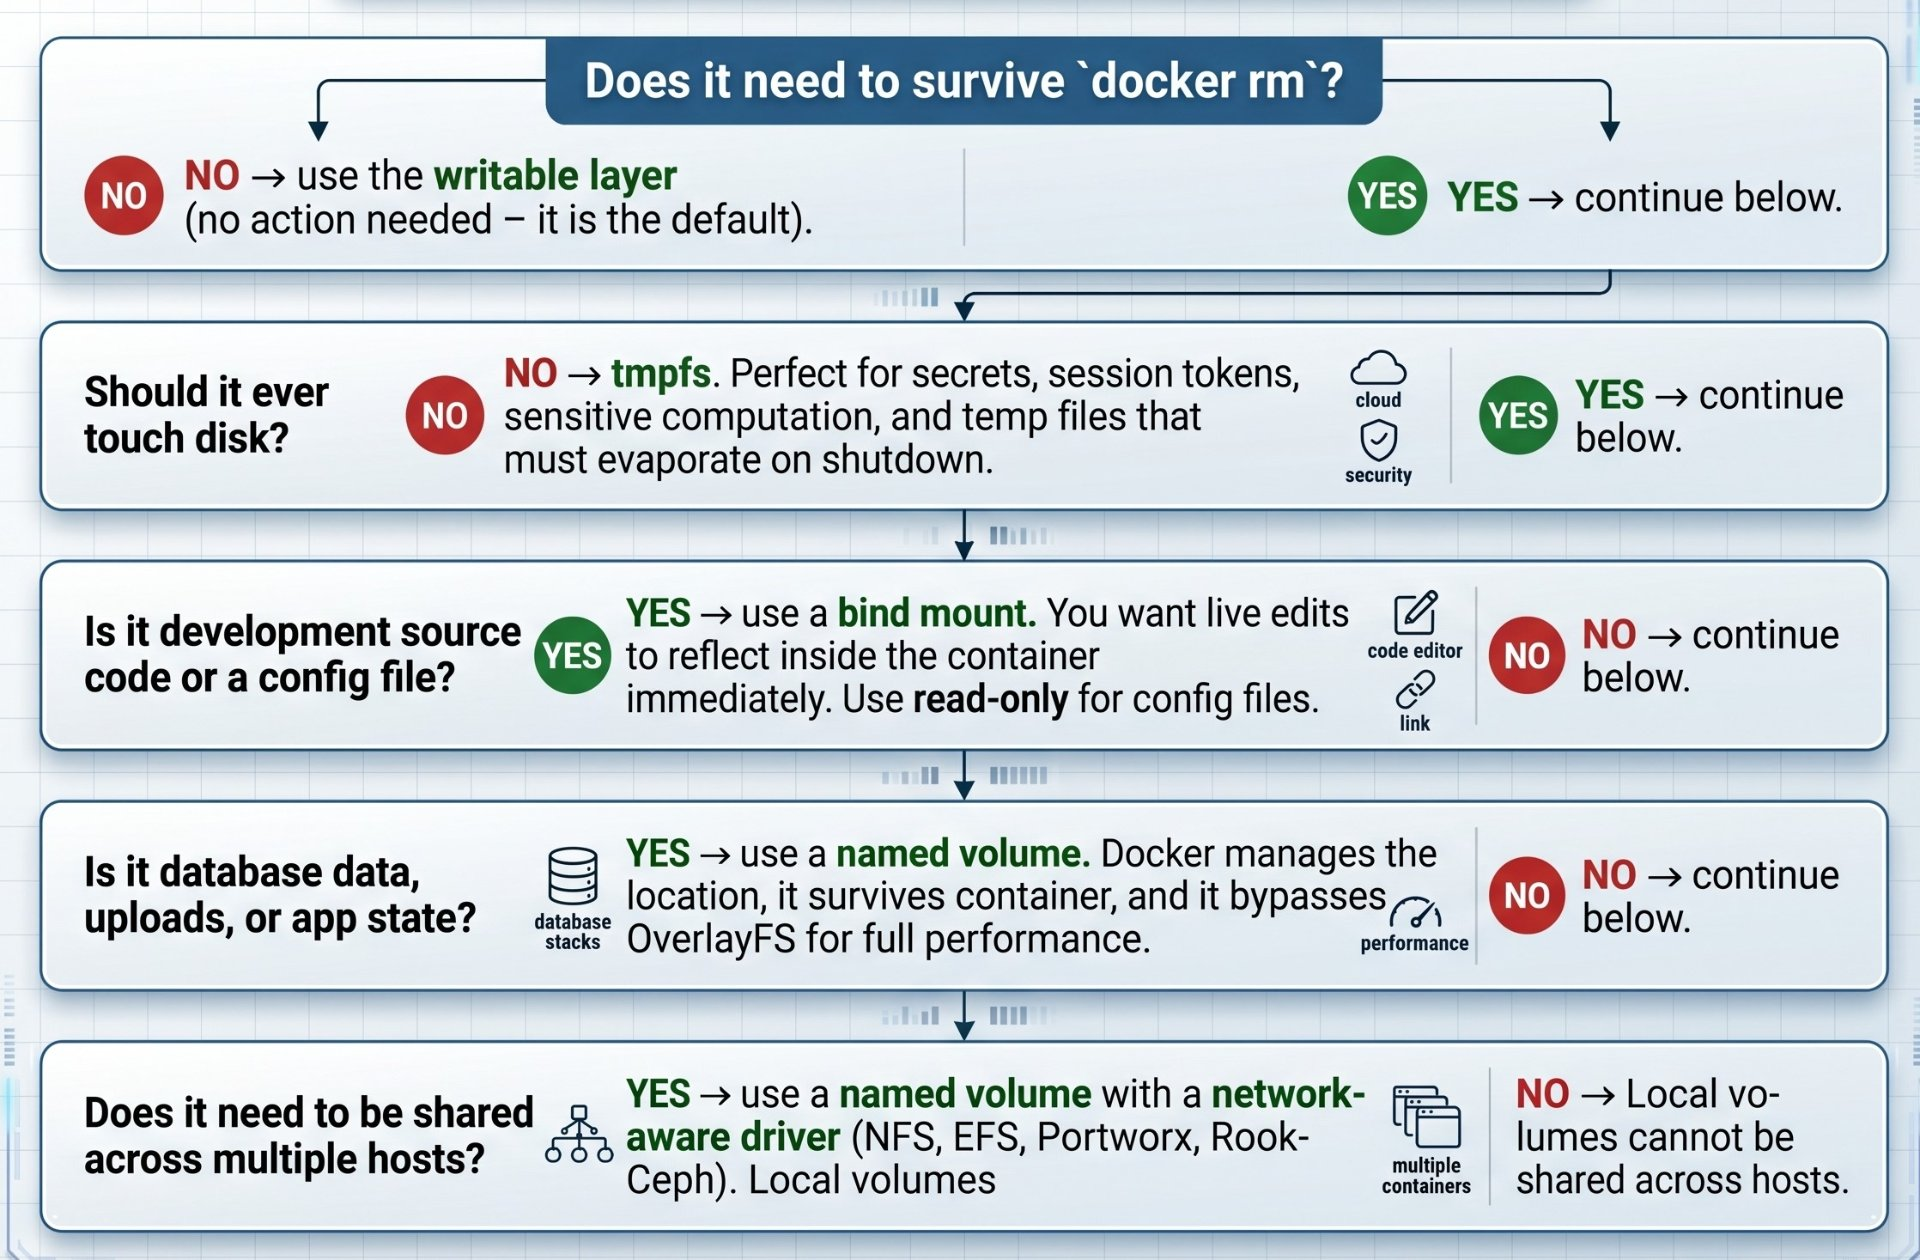
The summary in one sentence: use named volumes for anything that must persist, bind mounts for development and config injection, tmpfs for secrets and ephemeral speed, and treat the writable layer as a scratch pad you would never put production data on.
Author's Note
Chamath P.
DevOps Engineer
DevOps Engineer writing practical guides on Kubernetes, CI/CD, IaC, and SRE — based on real production experience.
This article was written with AI assistance. All technical claims and code examples have been personally verified before publishing.
Advertisements