Optimized Dockerfiles with Multi-Stage Builds
From bloated 1.2GB images to lean 18MB containers. A comprehensive guide for every level of DevOps engineer.

Advertisements
The Problem: Why Docker Images Get Fat
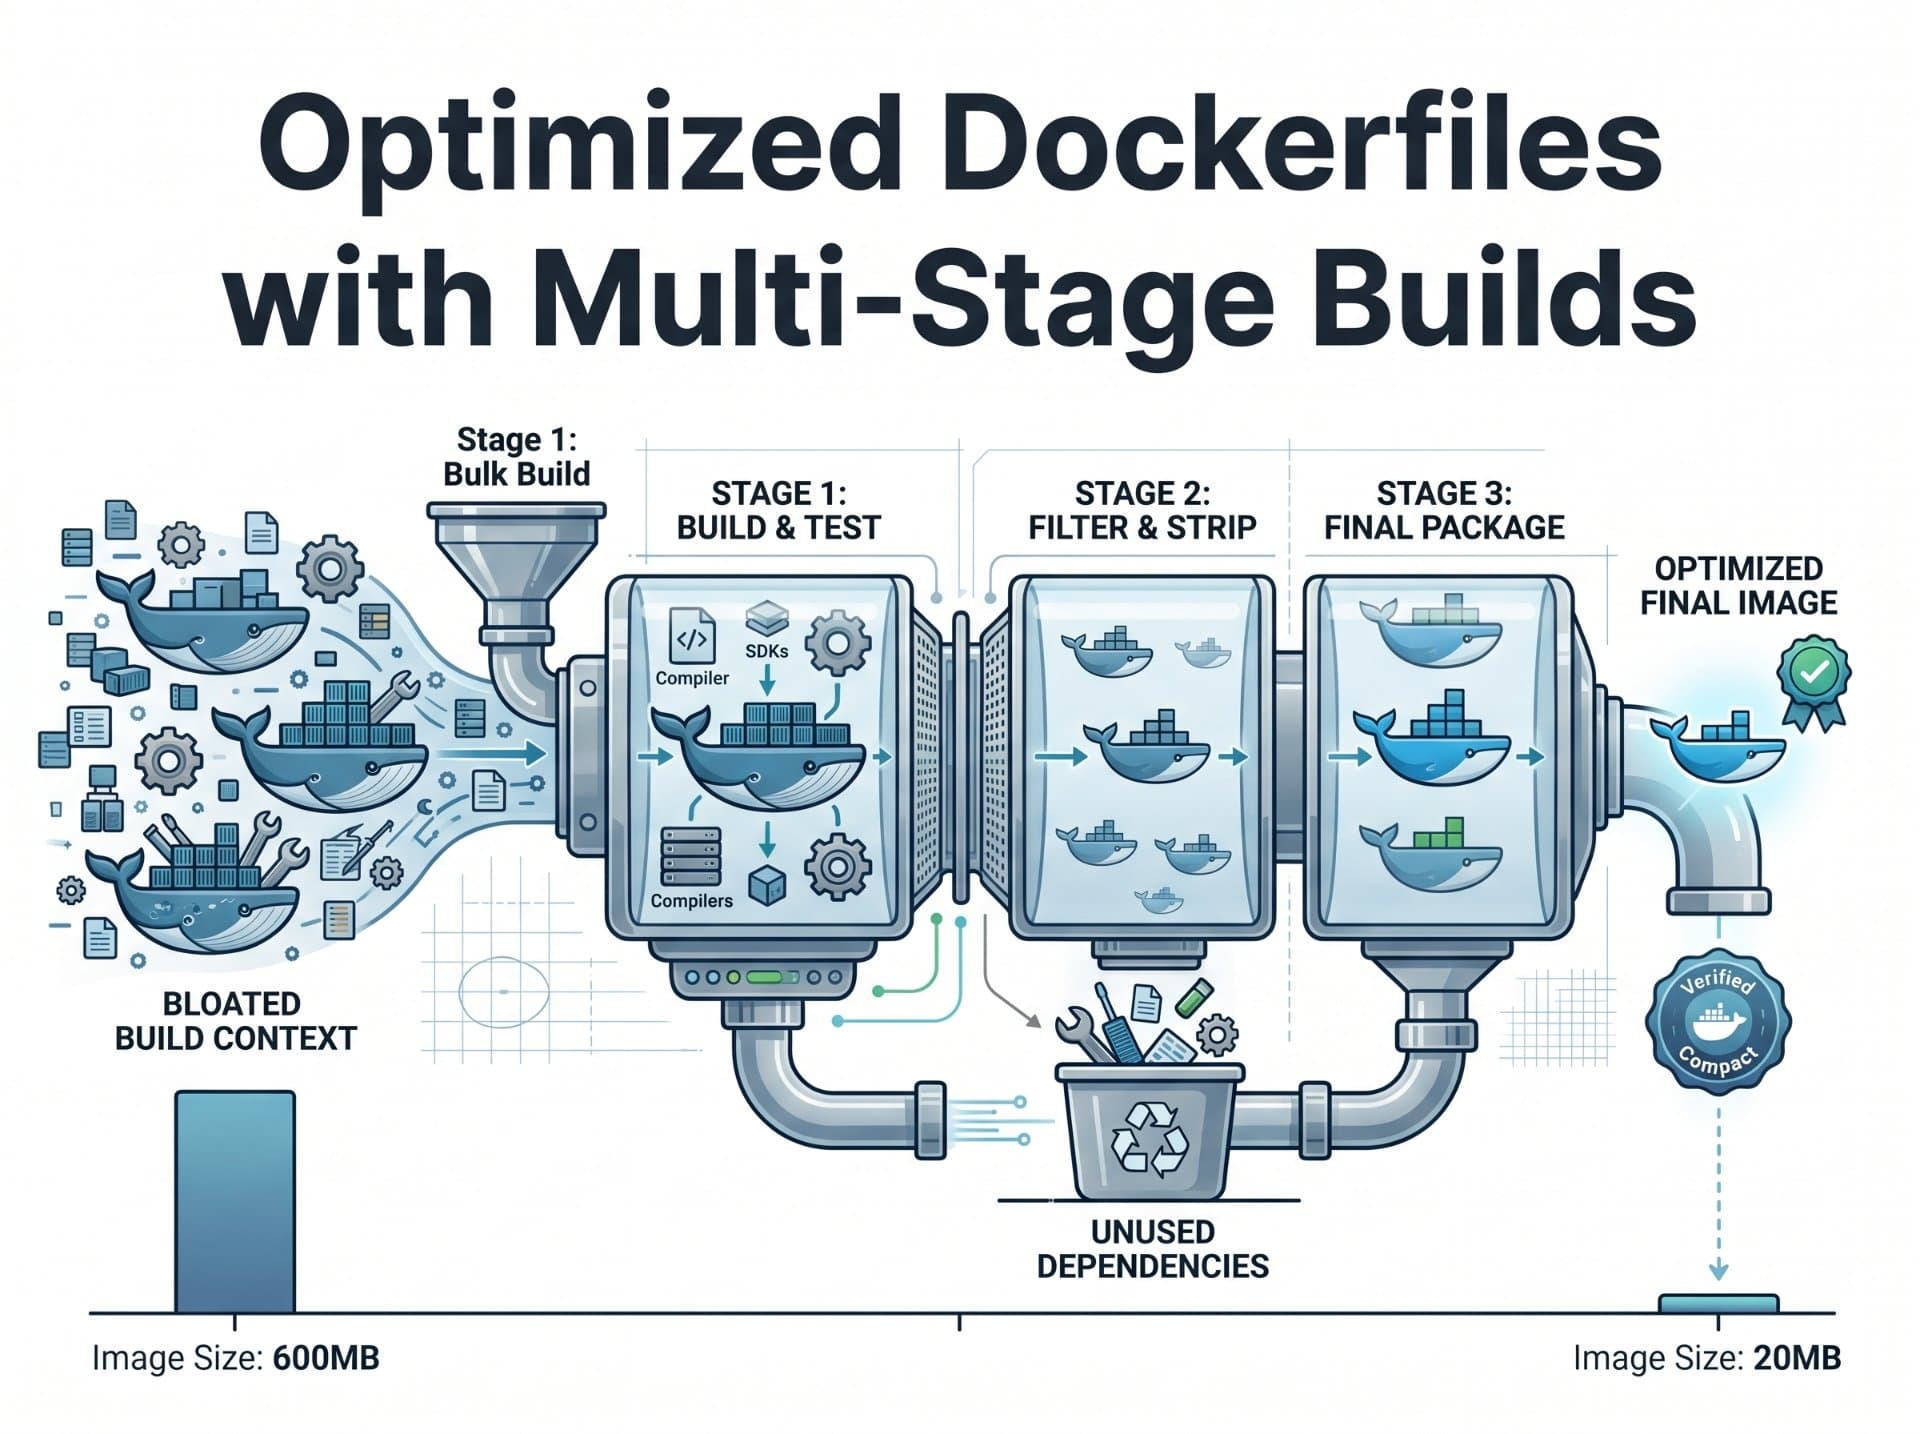
You built your app. It works locally. You write a Dockerfile, run docker build, push it to your registry and suddenly you're staring at a 1.2 GB image for a Hello World API. What happened?
The culprit is build tooling. To compile or bundle your application, you need compilers, package managers, build SDKs, test runners, and dev dependencies. But in production, you only need the final artifact; a binary, a .jar, a bundled dist/ folder. The rest is dead weight.
Analogy — The IKEA Furniture Metaphor
Imagine shipping a bookshelf to your customer but you also include the entire IKEA factory: the CNC machines, the lumber warehouse, the paint shop, the quality testing equipment. The bookshelf weighs 15 kg. The factory weighs 800 tonnes. Multi-stage builds let you ship only the finished bookshelf.
Before multi-stage builds, teams would write complex shell scripts, use separate Makefile targets, or maintain two Dockerfiles one for building, one for running. This was error-prone, hard to maintain, and violated the principle of reproducible builds.
# This image will be HUGE — includes Go toolchain, source, build cache
FROM golang:1.22

WORKDIR /app
COPY . .
RUN go mod download
RUN go build -o server ./cmd/server

EXPOSE 8080
CMD ["./server"]

# Result: ~1.1 GB image (Go SDK alone is ~800 MB)
# Attack surface: massive. Secrets risk: high. Deploy time: slow.What Are Multi-Stage Builds?
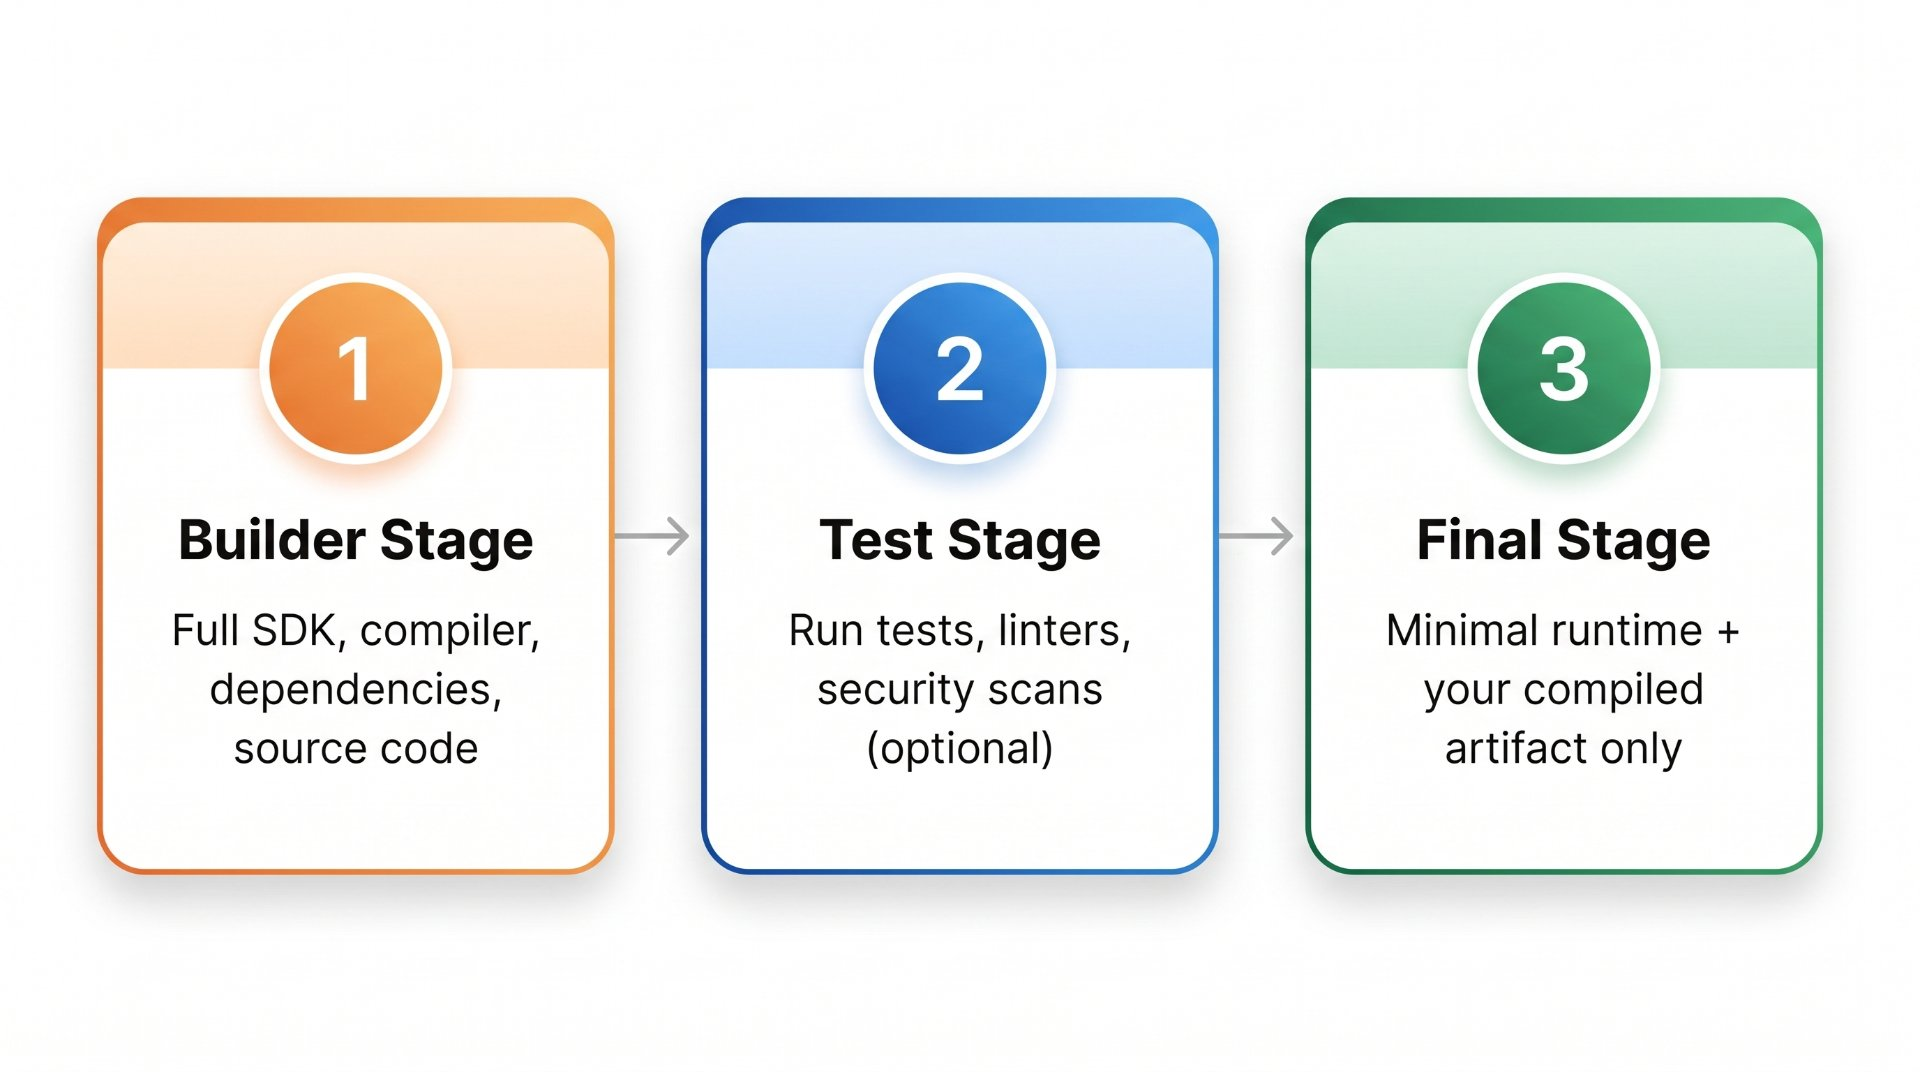
Introduced in Docker 17.05, multi-stage builds allow you to use multiple FROM instructions in a single Dockerfile. Each FROM starts a new build stage with its own filesystem. Crucially, you can selectively copy artifacts from one stage into another leaving everything else behind.
KEY INSIGHT
Only the last stage (or a named target stage) becomes the final Docker image. All intermediate stages are discarded — they exist only to produce artifacts. No build tools, no source code, no temp files leak into your production image.
The syntax is simple use AS <name> to label a stage, and COPY --from=<name> to pull files from it:
# Stage 1: Build environment
FROM golang:1.22 AS builder
# ... install deps, compile, build artifacts ...

# Stage 2: Production image
FROM gcr.io/distroless/static-debian12
COPY --from=builder /app/server /server
# ↑ Only this binary makes it to production
CMD ["/server"]Your First Multi-Stage Dockerfile
Let's build this step by step using a Go HTTP server as our guinea pig. We'll go from the naïve single-stage approach to a fully optimized multi-stage build.
Step 1 — The Builder Stage
We start with the full Go toolchain. This stage does the heavy lifting: download modules, compile, produce a static binary.
# ── Stage 1: Builder ──────────────────────────────────────────
FROM golang:1.22-alpine AS builder

# Set the working directory inside the container
WORKDIR /app

# Copy dependency manifests FIRST (for layer cache efficiency)
# If go.mod/go.sum haven't changed, Docker reuses the cached layer
COPY go.mod go.sum ./
RUN go mod download

# Now copy source code (invalidates cache only when source changes)
COPY . .

# Build a statically linked binary — no dynamic libraries needed
RUN CGO_ENABLED=0 \
    GOOS=linux \
    GOARCH=amd64 \
    go build \
    -ldflags="-w -s" \   # Strip debug info → smaller binary
    -o /app/server \
    ./cmd/server
💡 Layer caching trick: Always
COPYyour dependency manifest files (go.mod,package.json,pom.xml) and install dependencies before copying your source code. Since source changes frequently but dependencies don't, this avoids expensive re-downloads on every rebuild.
Step 2 — The Final (Production) Stage
Now we start fresh. A minimal base. We copy only the compiled binary. Nothing else.
# ── Stage 2: Production Image ─────────────────────────────────
# distroless: no shell, no package manager, minimal attack surface
FROM gcr.io/distroless/static-debian12

# Run as non-root user (distroless provides "nonroot" user)
USER nonroot:nonroot

# Copy the compiled binary from the builder stage
COPY --from=builder --chown=nonroot:nonroot /app/server /server

EXPOSE 8080

# Use exec form — no shell wrapping, proper signal handling
ENTRYPOINT ["/server"]
Step 3 — Adding a Test Stage (Professional Pattern)
A battle-tested pattern inserts a test stage between builder and production. If tests fail, the build fails your CI/CD pipeline gets free quality gates.
# ── Stage 1: Builder ──────────────────────────────────────────
FROM golang:1.22-alpine AS builder
WORKDIR /app
COPY go.mod go.sum ./
RUN go mod download
COPY . .
RUN CGO_ENABLED=0 go build -ldflags="-w -s" -o /app/server ./cmd/server

# ── Stage 2: Test ─────────────────────────────────────────────
FROM builder AS test
# Run unit tests — if these fail, docker build fails
RUN go test -v -race -coverprofile=/tmp/coverage.out ./...
# Optionally run linting
RUN go vet ./...

# ── Stage 3: Production ───────────────────────────────────────
FROM gcr.io/distroless/static-debian12
USER nonroot:nonroot
COPY --from=builder --chown=nonroot:nonroot /app/server /server
EXPOSE 8080
ENTRYPOINT ["/server"]
⚠️ Gotcha — Test Stage Execution
By default,
docker buildonly executes stages that are referenced by the final stage. Your test stage won't run unless the final stage references it (viaCOPY --from=test) or you target it explicitly withdocker build --target test .in your CI pipeline.
Real-World Examples
Node.js / React Application
Frontend apps need Node.js + npm to build, but the production artifact is just static files served by nginx. This is a perfect multi-stage candidate.
# ── Stage 1: Dependency Installation ─────────────────────────
FROM node:20-alpine AS deps
WORKDIR /app
COPY package.json package-lock.json ./
# ci = clean install, respects lockfile, faster in CI
RUN npm ci --only=production=false

# ── Stage 2: Build ────────────────────────────────────────────
FROM node:20-alpine AS builder
WORKDIR /app
COPY --from=deps /app/node_modules ./node_modules
COPY . .
# Set production env so React optimizes the bundle
ENV NODE_ENV=production
RUN npm run build

# ── Stage 3: Production (nginx) ───────────────────────────────
FROM nginx:1.27-alpine

# Remove default nginx config
RUN rm /etc/nginx/conf.d/default.conf

# Copy custom nginx config for SPA routing
COPY nginx.conf /etc/nginx/conf.d/

# Copy only the build output — NOT node_modules (1.6 GB gone!)
COPY --from=builder /app/dist /usr/share/nginx/html

EXPOSE 80
CMD ["nginx", "-g", "daemon off;"]
Java / Spring Boot with Maven
Java apps involve the JDK for compilation but only need the JRE at runtime. With GraalVM native images, you can go even further.
# ── Stage 1: Maven Build ──────────────────────────────────────
FROM maven:3.9-eclipse-temurin-21 AS builder
WORKDIR /build

# Cache Maven dependencies separately
COPY pom.xml .
RUN mvn dependency:go-offline -B

COPY src ./src
# Skip tests here — run them in a separate CI stage
RUN mvn package -DskipTests -B

# ── Stage 2: Extract layered JAR (Spring Boot 2.3+) ──────────
# Spring Boot supports layered JARs for better Docker caching
FROM eclipse-temurin:21-jre-alpine AS extractor
WORKDIR /app
COPY --from=builder /build/target/*.jar app.jar
RUN java -Djarmode=layertools -jar app.jar extract

# ── Stage 3: Production ───────────────────────────────────────
FROM eclipse-temurin:21-jre-alpine
WORKDIR /app

# Layers ordered by change frequency (slowest → fastest changing)
COPY --from=extractor /app/dependencies/ ./
COPY --from=extractor /app/spring-boot-loader/ ./
COPY --from=extractor /app/snapshot-dependencies/ ./
COPY --from=extractor /app/application/ ./

RUN addgroup -S appgroup && adduser -S appuser -G appgroup
USER appuser

ENTRYPOINT ["java", "org.springframework.boot.loader.JarLauncher"]
Python FastAPI / Flask
Python doesn't compile to a binary, but you can still benefit from multi-stage: separate build-time tools (like poetry, pip-compile, C-extension compilers) from the lean runtime.
# ── Stage 1: Export requirements with Poetry ──────────────────
FROM python:3.12-slim AS requirements
RUN pip install poetry==1.8.2
WORKDIR /app
COPY pyproject.toml poetry.lock ./
# Export prod deps to requirements.txt (no poetry needed at runtime)
RUN poetry export -f requirements.txt --without-hashes > requirements.txt

# ── Stage 2: Build wheels (compile C extensions) ──────────────
FROM python:3.12-slim AS builder
RUN apt-get update && apt-get install -y --no-install-recommends \
    gcc libpq-dev && rm -rf /var/lib/apt/lists/*
COPY --from=requirements /app/requirements.txt .
RUN pip wheel --no-cache-dir --wheel-dir /wheels -r requirements.txt

# ── Stage 3: Production ───────────────────────────────────────
FROM python:3.12-slim
ENV PYTHONDONTWRITEBYTECODE=1 \
    PYTHONUNBUFFERED=1 \
    PATH="/app/.venv/bin:$PATH"

# Install from pre-built wheels — no compiler needed
COPY --from=builder /wheels /wheels
COPY --from=requirements /app/requirements.txt .
RUN pip install --no-cache-dir --no-index --find-links=/wheels -r requirements.txt \
    && rm -rf /wheels

WORKDIR /app
COPY ./src ./src

RUN useradd -m appuser && chown -R appuser /app
USER appuser
CMD ["uvicorn", "src.main:app", "--host", "0.0.0.0", "--port", "8000"]Advanced Techniques
Targeting Specific Stages
You can build any intermediate stage using --target. This is powerful for CI/CD pipelines where different jobs need different outputs:
# Run only tests (for PR validation job)
docker build --target test -t myapp:test .

# Build the final prod image (for deployment job)
docker build --target prod -t myapp:latest .

# Build dev image with hot-reload tools included
docker build --target dev -t myapp:dev .

# Use BuildKit for parallel stage execution
DOCKER_BUILDKIT=1 docker build .
# Or with Buildx (BuildKit is always on)
docker buildx build .
Build Arguments for Flexible Images
Use ARG to parameterize your image useful for versioning or environment-specific builds without multiple Dockerfiles.
# ARG defined before FROM is available only during FROM resolution
ARG GO_VERSION=1.22
ARG ALPINE_VERSION=3.19

FROM golang:${GO_VERSION}-alpine${ALPINE_VERSION} AS builder

# Re-declare ARG inside stage to use it within the stage
ARG BUILD_VERSION=dev
ARG COMMIT_SHA=unknown

WORKDIR /app
COPY . .
RUN go build \
    -ldflags="-X main.Version=${BUILD_VERSION} -X main.Commit=${COMMIT_SHA}" \
    -o server .

FROM gcr.io/distroless/static-debian12
COPY --from=builder /app/server /server
ENTRYPOINT ["/server"]
docker build \
--build-arg GO_VERSION=1.22 \
--build-arg BUILD_VERSION="v2.4.1" \
--build-arg COMMIT_SHA="$(git rev-parse --short HEAD)" \
-t myapp:v2.4.1 .Parallel Stage Execution with BuildKit
Docker BuildKit (enabled by default in Docker 23+) can execute independent stages in parallel. Design your stages as a DAG (Directed Acyclic Graph) to exploit this:
# ── Frontend build (runs in parallel with backend) ────────────
FROM node:20-alpine AS frontend-builder
WORKDIR /fe
COPY frontend/package*.json ./
RUN npm ci
COPY frontend/ .
RUN npm run build

# ── Backend build (runs in parallel with frontend) ────────────
FROM golang:1.22-alpine AS backend-builder
WORKDIR /be
COPY backend/go.mod backend/go.sum ./
RUN go mod download
COPY backend/ .
RUN go build -o server .

# ── Final: merge both artifacts ───────────────────────────────
FROM gcr.io/distroless/static-debian12
# BuildKit builds the two stages above simultaneously
COPY --from=frontend-builder /fe/dist /static
COPY --from=backend-builder /be/server /server
ENTRYPOINT ["/server"]
Choosing the Right Base Image
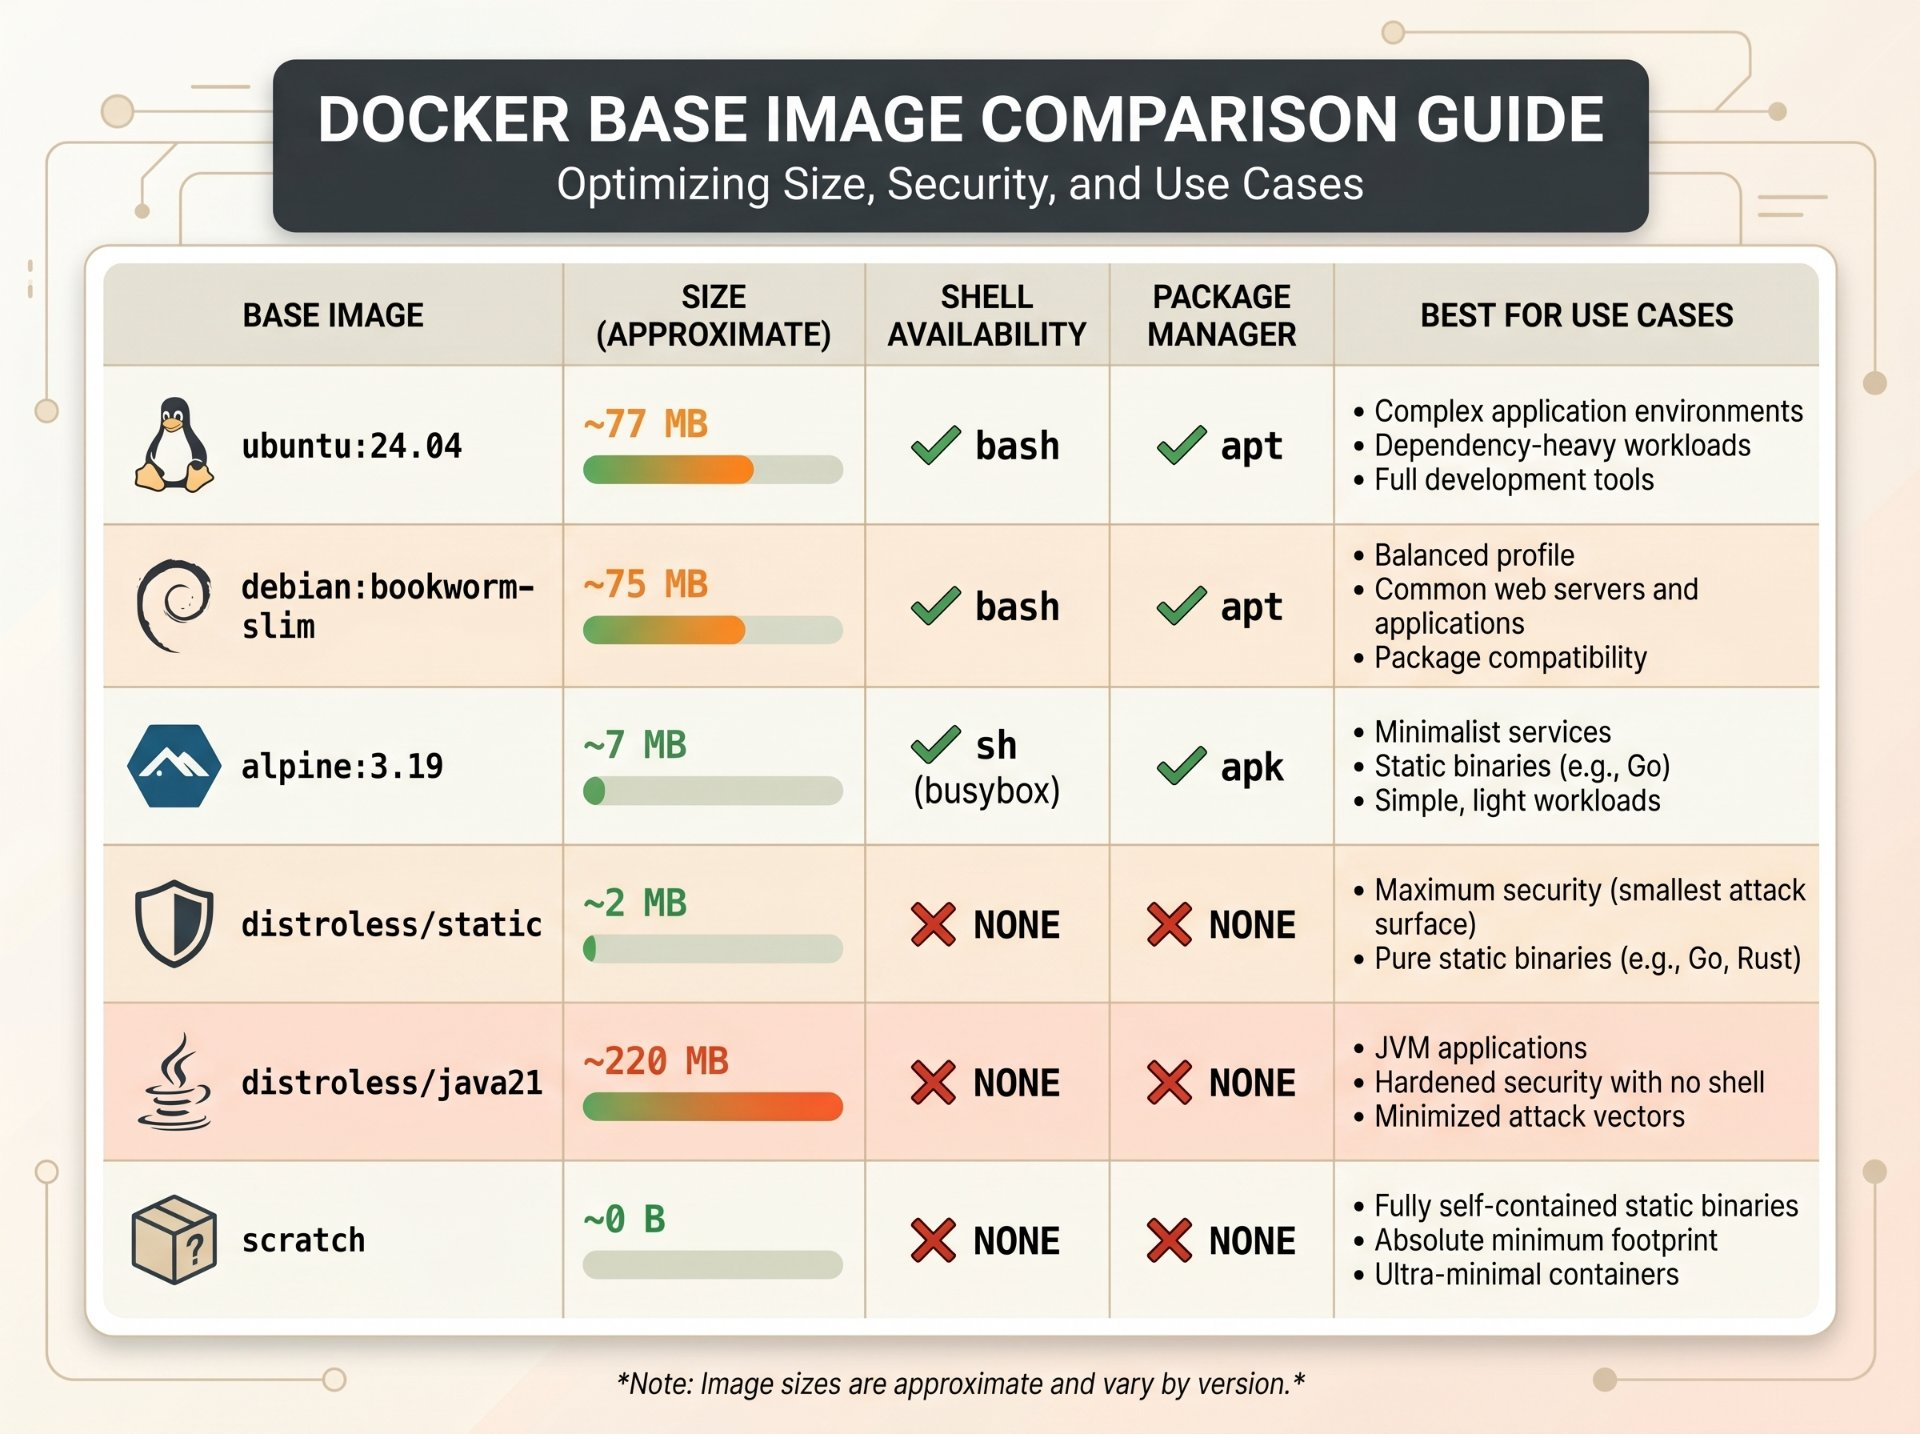
Analogy — Base Images as Apartments
Think of
ubuntuas a fully furnished apartment microwave, TV, toolbox, everything.alpineis a studio with just a bed and a mini-fridge.distrolessis a bare room with only a power outlet.scratchis an empty plot of land. The less furniture, the fewer things that can break or that an intruder can use against you.
Size Comparison & Benchmarks
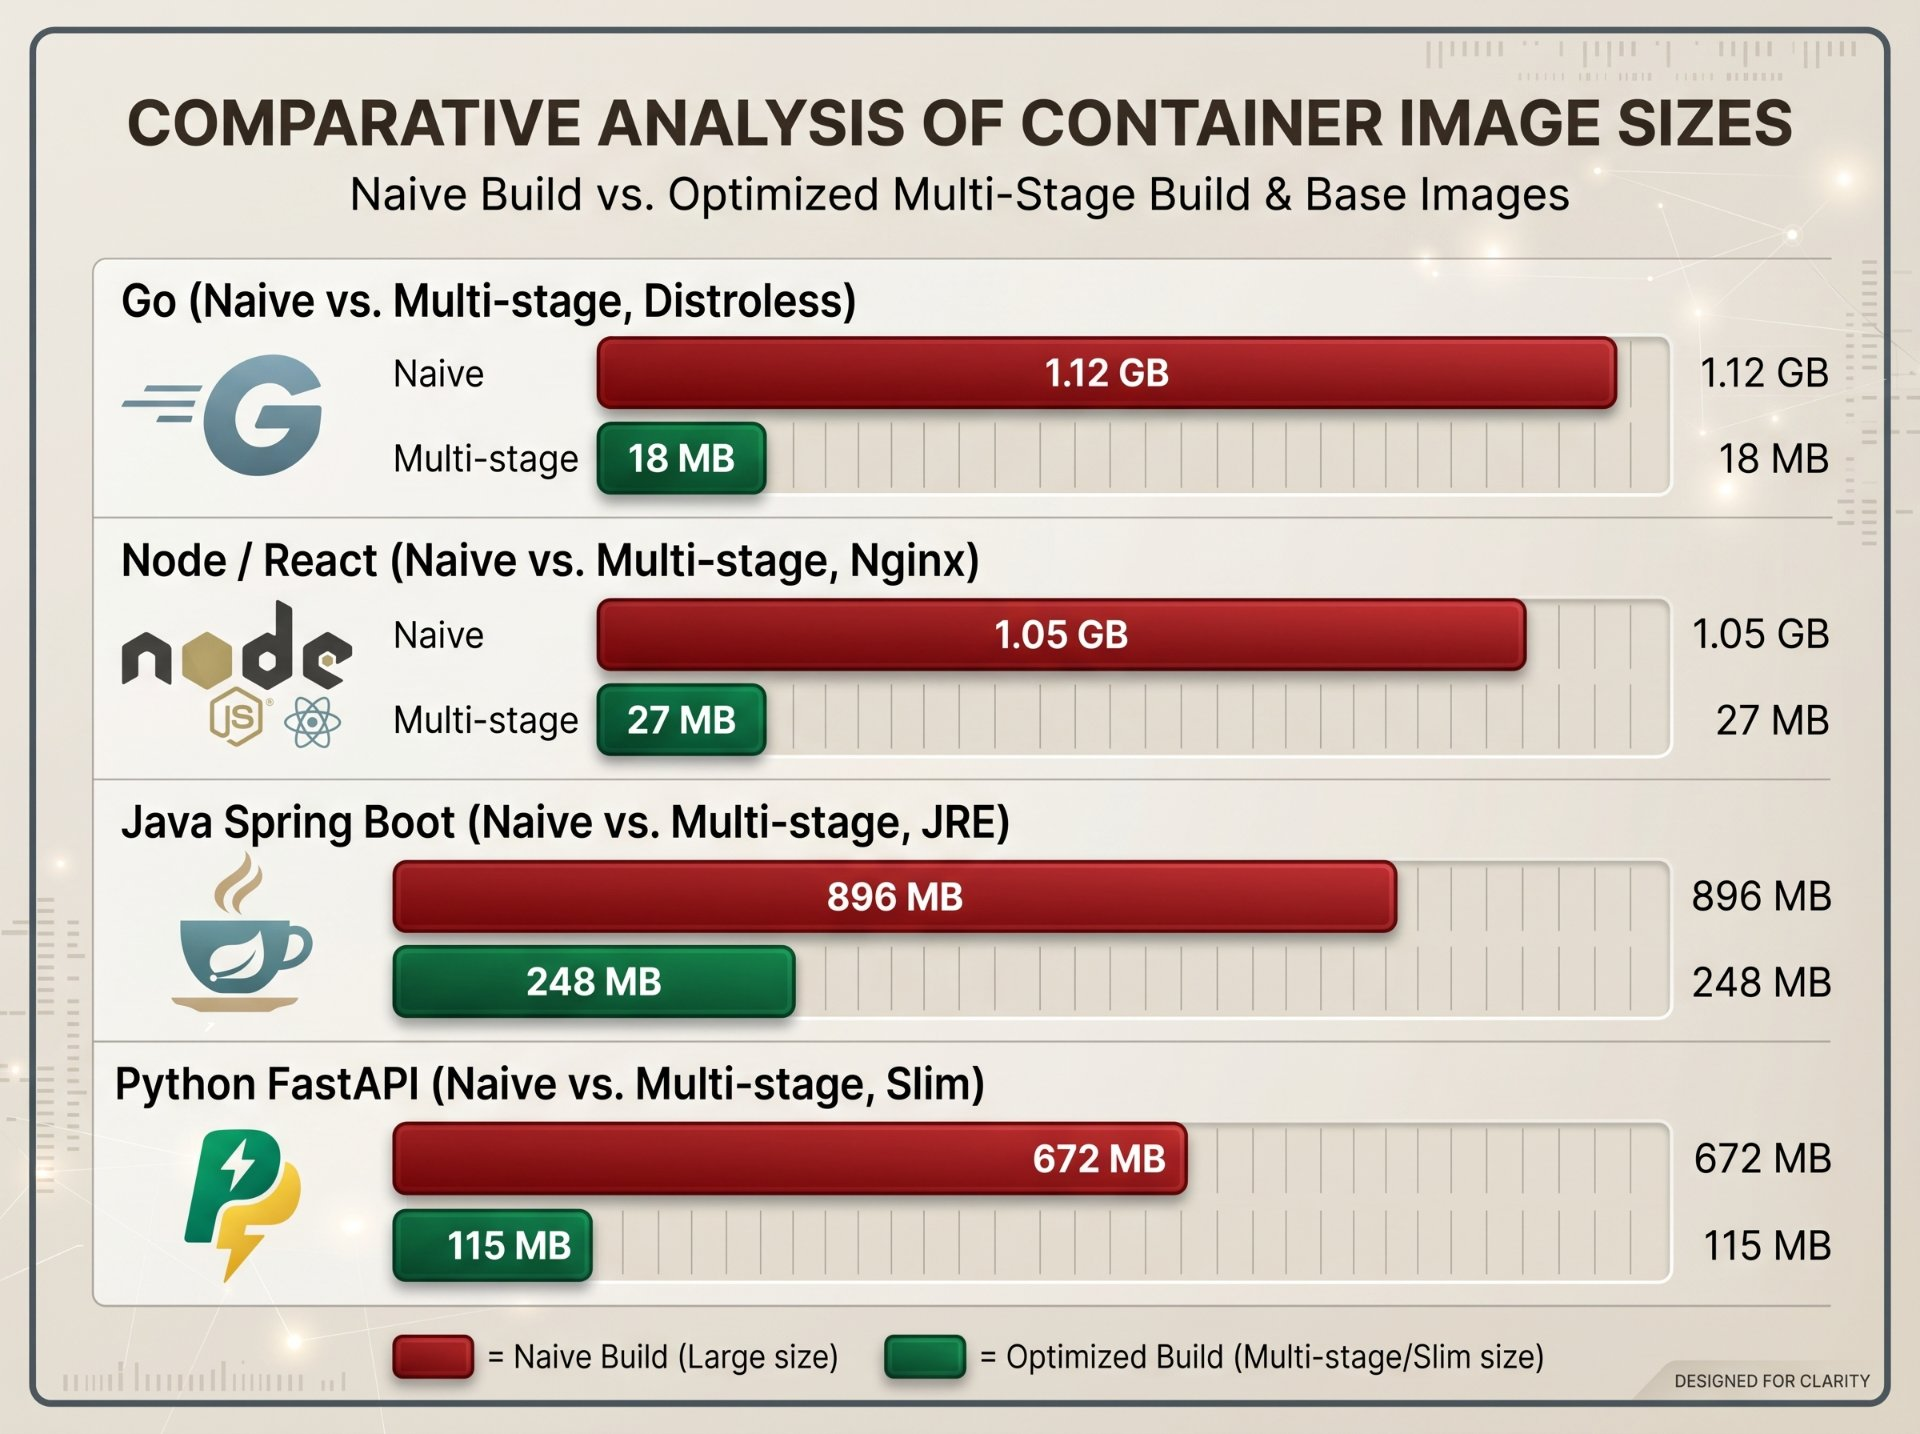
Here's what multi-stage builds actually deliver in practice across different stacks:
Why does image size matter?
Smaller images mean faster CI/CD pipelines (less to push/pull), reduced attack surface (fewer packages = fewer CVEs), lower cloud storage costs, faster cold starts in Kubernetes/serverless environments, and improved developer experience with quicker iteration loops.
Best Practices Checklist
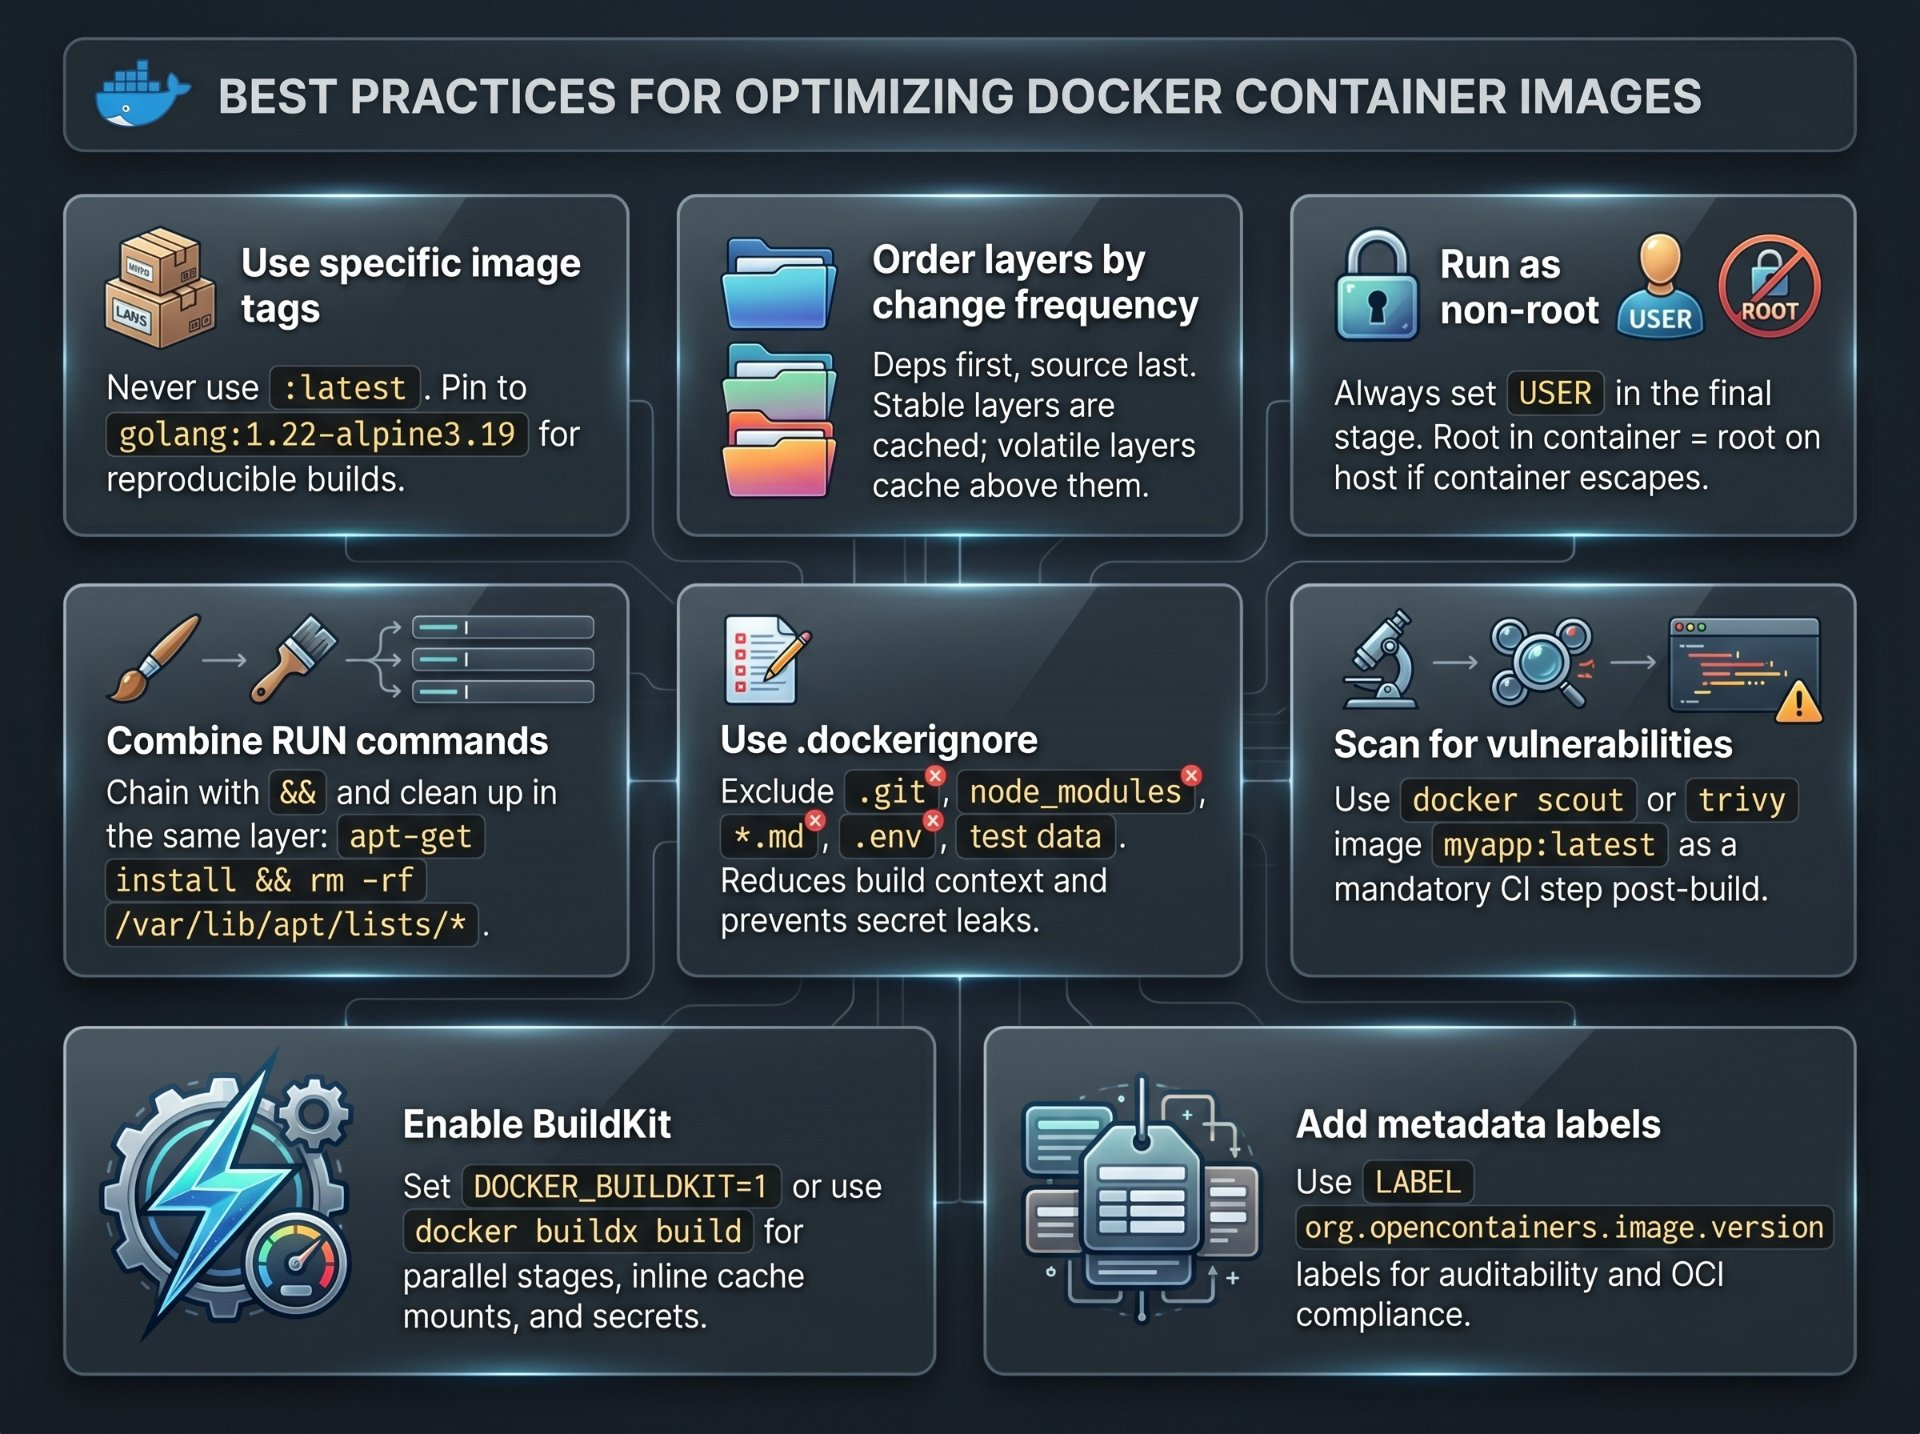
The .dockerignore File
This file is as important as the Dockerfile itself. It controls what gets sent to the build daemon as context and prevents secrets from ever entering the build:
# Version control
.git
.gitignore

# Documentation
README.md
docs/
*.md

# Environment and secrets
.env
.env.*
*.pem
*.key
secrets/

# Dependencies (rebuilt inside Docker)
node_modules/
vendor/
__pycache__/
*.pyc
.venv/

# Build artifacts
dist/
build/
target/
*.class

# IDE and OS
.vscode/
.idea/
.DS_Store
Thumbs.db

# Test and CI artifacts
coverage/
.nyc_output/
*.test
Dockerfile.dev
Using BuildKit Cache Mounts
An advanced BuildKit feature: cache mounts persist build caches between builds without baking them into layers the best of both worlds.
# syntax=docker/dockerfile:1.6
FROM golang:1.22-alpine AS builder
WORKDIR /app
COPY go.mod go.sum ./

# --mount=type=cache persists the Go module cache between builds
# Speeds up subsequent builds by 60-90% for large dependency trees
RUN --mount=type=cache,target=/go/pkg/mod \
    go mod download

COPY . .
RUN --mount=type=cache,target=/go/pkg/mod \
    --mount=type=cache,target=/root/.cache/go-build \
    CGO_ENABLED=0 go build -ldflags="-w -s" -o server .

# For npm projects:
# RUN --mount=type=cache,target=/root/.npm npm ci
# For pip:
# RUN --mount=type=cache,target=/root/.cache/pip pip install -r requirements.txt
🔐 Handling secrets securely: Never
COPYorARGsecrets they persist in layer history. UseRUN --mount=type=secret,id=mysecret cat /run/secrets/mysecretwith BuildKit secrets, or inject them at runtime via environment variables or a secrets manager (Vault, AWS Secrets Manager).
Author's Note
Chamath P.
DevOps Engineer
DevOps Engineer writing practical guides on Kubernetes, CI/CD, IaC, and SRE — based on real production experience.
This article was written with AI assistance. All technical claims and code examples have been personally verified before publishing.
Advertisements