Rootless Docker & The Daemonless Future
Docker's daemon-centric model was the right choice in 2013. In 2025, the industry has moved. Rootless containers, fork/exec runtimes, and Podman are not alternatives to Docker they are where container technology is going. Here is why, how, and what it means for your work.

Advertisements
The daemon problem — why root has always been the enemy
When you run docker build or docker run, the Docker CLI sends a request to dockerd the Docker daemon. That daemon runs as root. Always. Every container you have ever created, every image you have ever built, was orchestrated by a root-owned process sitting permanently on your machine listening on a Unix socket.
The analogy
Running Docker's daemon-centric model is like requiring every developer at a company to log into the CEO's account to deploy their code. The CEO's account has the keys to everything. One compromised developer, one bad container image, one path traversal — and the whole machine is root. The daemon is a standing invitation to privilege escalation.
This is not theoretical. The Docker socket at /var/run/docker.sock is one of the most reliably exploitable paths to full host root in the industry. Anyone or anything with write access to that socket can trivially escalate to host root in seconds:
# If an attacker has access to /var/run/docker.sock, they own the host
# This takes approximately 5 seconds:
docker run -it --rm \
  -v /:/host \
  --privileged \
  alpine chroot /host sh

# The attacker is now root on the host. Game over.
# This is why mounting the Docker socket into any container
# is equivalent to giving that container root on the host.
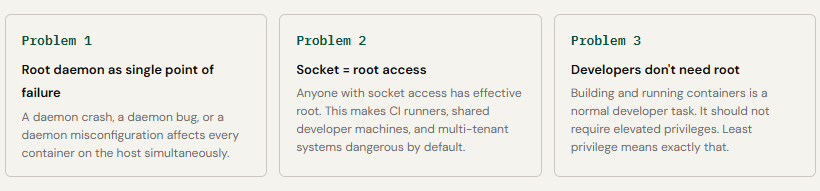
The three core structural problems with the traditional Docker model:
Rootless Docker — how it actually works
Rootless mode, introduced as experimental in Docker 19.03 and stable since Docker 20.10, runs the entire Docker daemon and every container it manages inside a user namespace. The daemon process is owned by your regular user account. No root required. No privileged daemon on the host.
The key enabling technology is the Linux user namespace: the same primitive we explored in the "Under the Hood" article. User namespaces allow an unprivileged user to appear as root inside a namespace while remaining a normal user on the host. UID 0 inside the container maps to, say, UID 1000 on the host. The process thinks it is root. The host kernel knows it is not.
The user namespace UID mapping
When rootless Docker starts, it reads /etc/subuid and /etc/subgid files that allocate a range of subordinate UIDs to each user. A typical entry gives a user 65536 UIDs to work with. The user namespace maps UIDs 0–65535 inside the namespace to those subordinate UIDs on the host. So container root (UID 0) maps to, say, host UID 100000 a completely unprivileged account with no special permissions.
# Check your subordinate UID range
cat /etc/subuid
youruser:100000:65536   # user gets UIDs 100000–165535 on host

# Start a rootless container, check what it looks like from outside
docker run -d --name test alpine sleep 3600

# Find the container's PID on the host
docker inspect test --format '{{.State.Pid}}'
47823

# See its UID on the HOST — it's not root at all
ps -o uid,pid,comm -p 47823
UID      PID    COMM
100000   47823  sleep   # UID 100000 on host — unprivileged

# But INSIDE the container it thinks it's root
docker exec test id
uid=0(root) gid=0(root)   # root inside, but harmless on the host
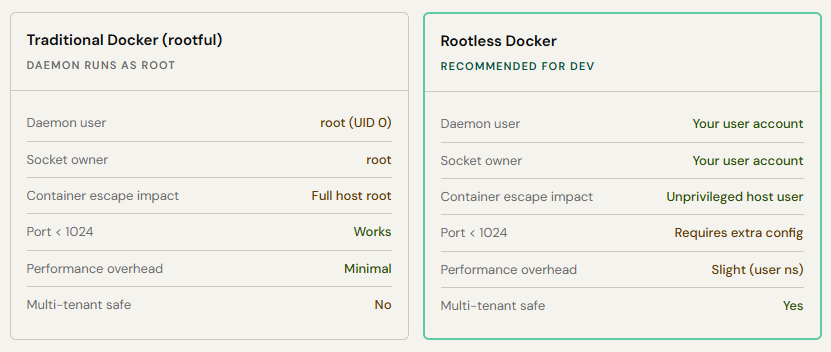
What rootless changes — and what it doesn't
Setting up rootless Docker
# Prerequisites: kernel 5.11+ (for OverlayFS in user namespaces)
# Check kernel version
uname -r
5.15.0-91-generic   # good

# Check your subuid range is configured
grep $(whoami) /etc/subuid /etc/subgid

# If missing, add them (as root, one time)
sudo usermod --add-subuids 100000-165535 --add-subgids 100000-165535 $(whoami)

# Install rootless Docker (if Docker is already installed)
dockerd-rootless-setuptool.sh install

# Or from scratch using the rootless-specific install script
curl -fsSL https://get.docker.com/rootless | sh

# Set environment variables (add to ~/.bashrc or ~/.zshrc)
export PATH=/home/$USER/bin:$PATH
export DOCKER_HOST=unix:///run/user/$(id -u)/docker.sock

# Start rootless daemon as a systemd user service (starts on login)
systemctl --user enable --now docker
systemctl --user status docker

# Verify — daemon should run as your user, not root
ps aux | grep dockerd
youruser  1234  dockerd --data-root /home/youruser/.local/share/docker

# Everything works exactly as before
docker run hello-world
# Binding to ports below 1024 requires a kernel setting
# Option 1: lower the unprivileged port range (system-wide)
sudo sysctl net.ipv4.ip_unprivileged_port_start=80
# Make it permanent
echo "net.ipv4.ip_unprivileged_port_start=80" | sudo tee /etc/sysctl.d/99-rootless.conf
# Option 2: use a reverse proxy on the host — recommended for production
# Run app on port 8080 (no privilege needed), nginx/caddy proxies 80 → 8080
# Rootless data is stored per-user, not in /var/lib/docker
ls ~/.local/share/docker/
containers/ image/ network/ overlay2/ volumes/
# Each user has completely isolated Docker state
# User A's containers cannot see User B's containers — everRootless limitations to know
Rootless mode does not support: --privileged containers, AppArmor profiles (seccomp still works), --network host, some storage drivers on older kernels (use overlay2 with kernel 5.11+), and docker cp from containers running as non-root inside rootless mode on some distros. These are acceptable tradeoffs for development and most production workloads.
Podman — daemonless by design, not by retrofit
Rootless Docker is Docker retrofitted to drop privileges. Podman was designed from day one to work without a daemon, without root, and without a long-running privileged process of any kind. It is the Red Hat/Fedora answer to the daemon problem and in many ways, the more architecturally honest solution.
The Podman name comes from "Pod Manager" a nod to Kubernetes pods. Podman can natively create pods (groups of containers sharing namespaces), generate Kubernetes YAML from running pods, and play Kubernetes YAML directly. It is, intentionally, a Kubernetes-adjacent tool.
The core architectural difference
When you run docker run, the CLI sends a request to a long-running daemon that spawns the container. When you run podman run, the CLI is the container launcher. It forks a child process, sets up namespaces and cgroups itself, and executes your container directly, with no intermediary daemon. The container is a direct child of your shell process. Podman exits. The container runs. No daemon ever existed.
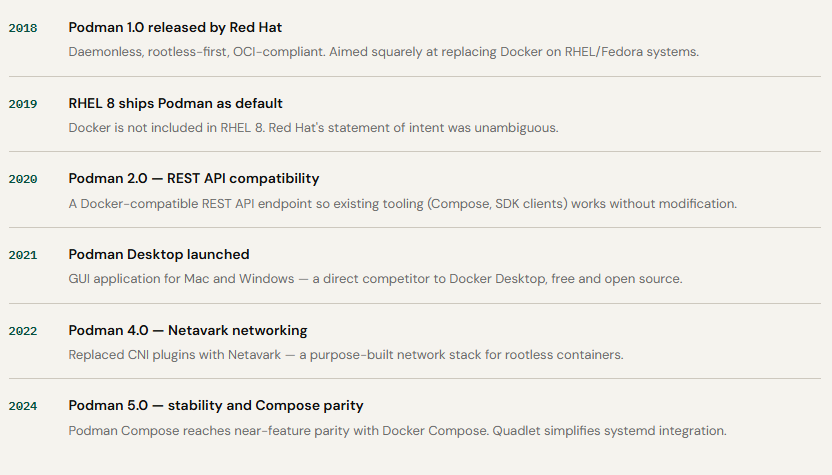
Docker vs Podman — the architectural contrast
The diagram below illustrates the fundamental structural difference. On the left, Docker's client–daemon model. On the right, Podman's fork/exec model. Notice how many components disappear.
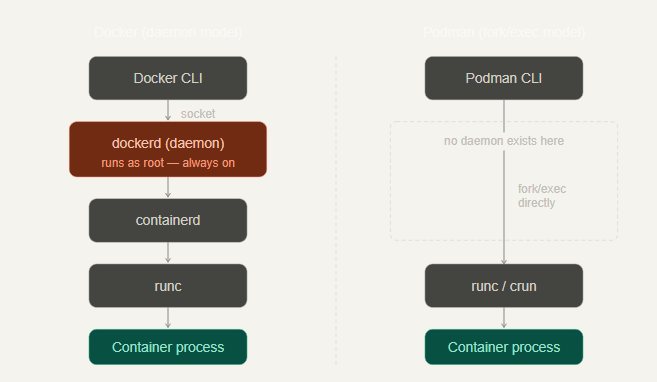
The missing daemon is not just an architectural detail it has profound operational consequences. When Podman runs a container, that container is a direct child of your shell. If you run podman run -d myapp, the container process is adopted by systemd (PID 1) as your shell exits, but it was never managed by a daemon. You can kill the Podman binary and the container keeps running. There is no single point of failure.
# Start a container with Podman
podman run -d --name myapp nginx:alpine

# Check the process tree — no daemon anywhere
pstree -p $(id -u)
bash(1234)─── conmon(5678)─── nginx(5679)
# conmon is Podman's shim (equivalent to containerd-shim)
# It is owned by YOUR user, not root

# Verify: kill conmon — container keeps running
kill 5678
podman ps   # still listed
ps aux | grep nginx   # nginx still running as your user

# There is no dockerd to kill. No single point of failure.
Migrating from Docker to Podman — command by command
Podman was explicitly designed as a Docker drop-in. The command syntax is intentionally identical. For most operations, you can literally alias docker to podman and nothing will break.
# Option 1: alias — try Podman without changing any scripts
alias docker=podman

# Option 2: symlink — affects all tools that call 'docker'
sudo ln -sf $(which podman) /usr/local/bin/docker

# Option 3: docker-podman compatibility package (Fedora/RHEL)
sudo dnf install podman-docker
# This installs a docker shim that routes to podman
# AND emulates the Docker socket at /var/run/docker.sock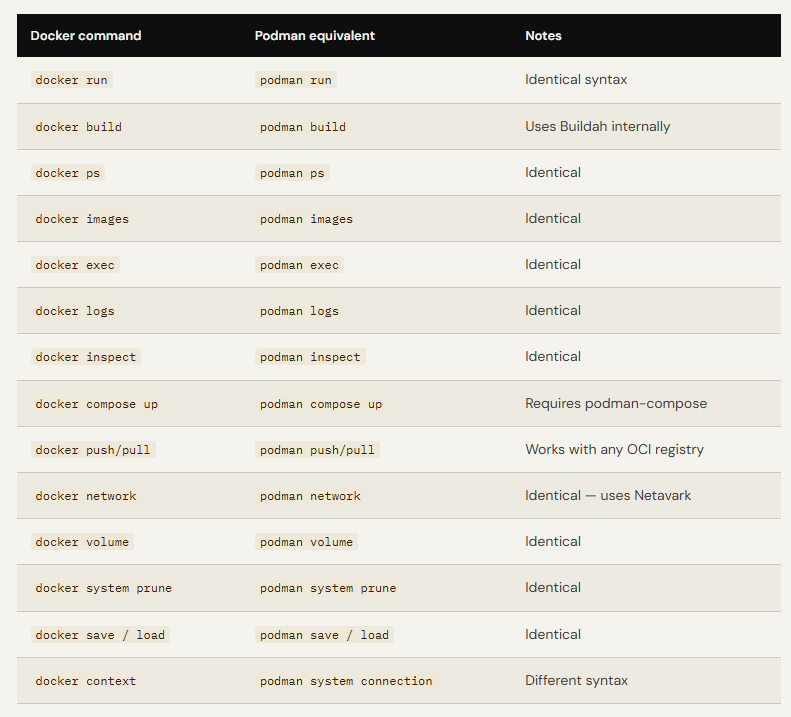
# Difference 1: Image storage location
# Docker: /var/lib/docker/
# Podman: ~/.local/share/containers/storage/ (per-user, rootless)

# Difference 2: Podman does not pull from Docker Hub by default
# It searches multiple registries — configure in /etc/containers/registries.conf
cat /etc/containers/registries.conf
# Add Docker Hub as default unqualified search registry:
# unqualified-search-registries = ["docker.io", "quay.io", "gcr.io"]

# Difference 3: localhost registry — Podman is stricter about TLS
podman run --tls-verify=false localhost:5000/myimage
# Or configure in /etc/containers/registries.conf.d/local.conf:
# [[registry]]
# location = "localhost:5000"
# insecure = true

# Difference 4: No Docker socket by default (good!)
# If tools expect /var/run/docker.sock, start the Podman socket service:
systemctl --user enable --now podman.socket
export DOCKER_HOST=unix:///run/user/$(id -u)/podman/podman.sockBuildah & Skopeo — the rest of the toolchain
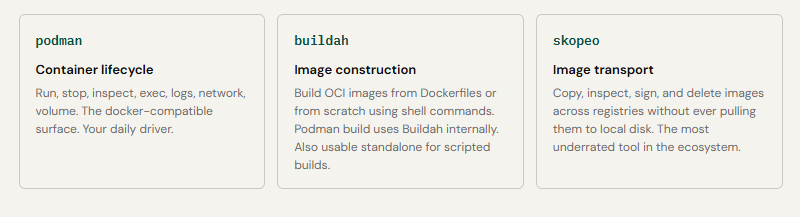
Podman is part of a three-tool family. Each tool does one thing, does it well, and composes cleanly with the others:
Buildah — building without a Dockerfile
Buildah's most powerful feature is the ability to build images using shell commands directly no Dockerfile needed. This enables fully scriptable, programmatic image construction. It is especially useful in CI pipelines where you want to avoid the Docker daemon entirely.
# Build an image using shell commands — no Dockerfile
# This is what Dockerfiles compile down to internally

# Start from a base image
CTR=$(buildah from alpine:3.19)

# Run commands inside the working container
buildah run $CTR -- apk add --no-cache nodejs npm

# Copy files in
buildah copy $CTR ./src /app/src
buildah copy $CTR ./package.json /app/

# Set metadata
buildah config --workingdir /app $CTR
buildah config --entrypoint '["node", "/app/src/server.js"]' $CTR
buildah config --port 3000 $CTR
buildah config --label maintainer="[email protected]" $CTR

# Commit to an OCI image
buildah commit $CTR myapp:latest

# Push directly to a registry
buildah push myapp:latest docker://registry.example.com/myapp:latest

# Clean up the working container
buildah rm $CTR
Skopeo — the image Swiss Army knife
# Inspect a remote image WITHOUT pulling it — just the manifest
skopeo inspect docker://node:20-alpine
# Returns: architecture, OS, layers, labels, exposed ports
# Incredibly fast — no multi-hundred MB download

# Copy an image between registries WITHOUT touching local disk
skopeo copy \
  docker://docker.io/myapp:latest \
  docker://registry.example.com/myapp:latest

# Copy from ECR to GCR (cross-cloud promotion)
skopeo copy \
  docker://123456789.dkr.ecr.us-east-1.amazonaws.com/myapp:v1.2.3 \
  docker://gcr.io/myproject/myapp:v1.2.3

# Sync an entire repository between registries
skopeo sync \
  --src docker --dest docker \
  registry-a.example.com/myapp \
  registry-b.example.com/myapp

# Delete an image from a registry
skopeo delete docker://registry.example.com/myapp:old-tag

# Sign an image with a GPG key
skopeo copy \
  --sign-by [email protected] \
  docker://myapp:latest \
docker://registry.example.com/myapp:latestPodman Compose & pods — the Kubernetes bridge
Podman's native concept of a pod directly mirrors Kubernetes pods. Containers in the same pod share a network namespace they talk to each other via localhost, and appear as a single unit to the outside world. This is not just a conceptual bridge; Podman can generate valid Kubernetes YAML from a running pod and play Kubernetes YAML directly.
# Create a pod (shared network namespace)
podman pod create --name webapp --publish 8080:80

# Add containers to the pod
podman run -d --pod webapp --name nginx nginx:alpine
podman run -d --pod webapp --name api myapp/api:latest
# nginx and api reach each other via localhost — they share eth0

# Generate Kubernetes YAML from the running pod
podman generate kube webapp > webapp-k8s.yaml
# This is valid Kubernetes YAML — deploy directly to a cluster

# Play Kubernetes YAML locally with Podman (no cluster needed)
podman play kube webapp-k8s.yaml

# This workflow: develop locally with Podman → generate YAML → deploy to K8s
# is far more direct than the Docker → docker-compose → K8s YAML translation chain
Quadlet — systemd-native container management
Quadlet, introduced in Podman 4.4, lets you manage containers as systemd units using simple .container files no compose files needed. On a production Linux server, this is the most operator-friendly pattern: containers managed by systemd, restarted by systemd, logged by journald, exactly like any other system service.
[Unit]
Description=My application container
After=network-online.target

[Container]
Image=myapp/api:1.4.2
PublishPort=8080:3000
Environment=NODE_ENV=production
Secret=db_password,type=env,target=DB_PASSWORD
Volume=/data/uploads:/app/uploads:Z
HealthCmd=curl -f http://localhost:3000/health
HealthInterval=10s
HealthRetries=5
AutoUpdate=registry         # auto-pull updates from registry

[Service]
Restart=always
TimeoutStartSec=60

[Install]
WantedBy=default.target
# Place the .container file and reload systemd
systemctl --user daemon-reload
# Manage the container like any systemd service
systemctl --user enable --now myapp
systemctl --user status myapp
journalctl --user -u myapp -f # logs via journald
systemctl --user restart myapp
# Auto-update: check and pull new images
podman auto-update
# Or schedule via a systemd timer — Podman ships one by default
systemctl --user enable --now podman-auto-update.timerThe OCI ecosystem — where the industry is converging
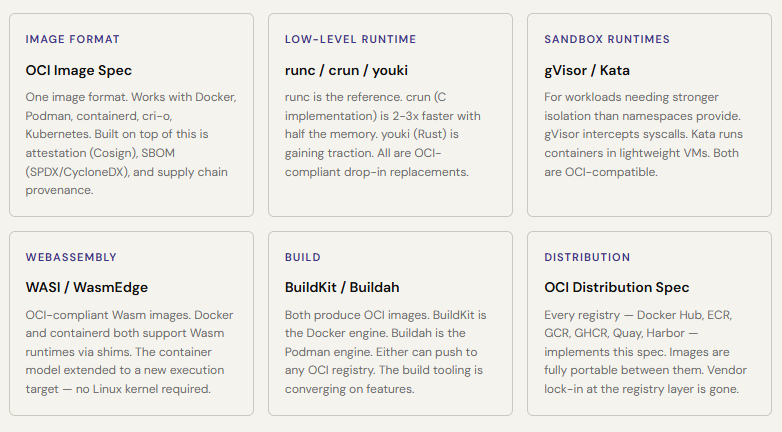
The Open Container Initiative has succeeded in its mission: container images and runtimes are now a commodity, interoperable across every tool in the ecosystem. This is the landscape as of 2025:
What to use when — the honest guide
You are a developer on a laptop / workstation
→ Use rootless Docker or Podman Desktop
  Both give you the Docker CLI you know. Rootless Docker if you want
  minimum change. Podman if you're on Fedora/RHEL or care about
  the daemonless architecture. The daily experience is identical.

You are running a CI/CD pipeline (GitHub Actions, GitLab, etc.)
→ Use rootless Docker or Kaniko or Buildah
  Never mount /var/run/docker.sock in CI runners.
  GitHub Actions: use docker/build-push-action (BuildKit, rootless-aware)
  GitLab: use kaniko executor or buildah for rootless builds in pods

You are running containers on a production Linux server (not K8s)
→ Use Podman + Quadlet (systemd units)
  Containers as systemd services is the most operator-friendly pattern.
  Auto-restart, journald logging, systemd dependency ordering — for free.
  No daemon to babysit. Rootless by default.

You are deploying to Kubernetes
→ Use containerd (already there) + Buildah or BuildKit for images
  Docker is not in the picture at runtime — Kubernetes uses containerd.
  For building: Kaniko (in-cluster), Buildah (CI), or BuildKit (fastest).
  For local dev against a cluster: use podman play kube or Telepresence.

You need to build multi-platform images (amd64 + arm64)
→ Use Docker Buildx (BuildKit) or buildah manifest
  docker buildx build --platform linux/amd64,linux/arm64 -t myapp .
  BuildKit's QEMU emulation + manifest list support is mature and fast.

You are building images inside a container (Docker-in-Docker)
→ Never mount the Docker socket. Use Kaniko or Buildah.
  Kaniko runs as a container, builds without daemon, pushes to registry.
  Buildah works rootless inside a rootless container — fully nested.
The honest summary
Docker is not going away it is too entrenched, too tooled, and too familiar. But its daemon-centric, root-requiring architecture is increasingly an anachronism. The industry direction is clear: rootless, daemonless, OCI-native tooling. Podman is not "Docker but different" it is "Docker done right, with ten years of hindsight." For new projects, for production Linux servers, and for teams that take security seriously, Podman + Buildah + Skopeo is the better stack. For teams with existing Docker infrastructure, rootless Docker is a low-friction upgrade that eliminates the biggest attack surface with one command.
Author's Note
Chamath P.
DevOps Engineer
DevOps Engineer writing practical guides on Kubernetes, CI/CD, IaC, and SRE — based on real production experience.
This article was written with AI assistance. All technical claims and code examples have been personally verified before publishing.
Advertisements